Creating a gadget is very simple. To create a gadget through a Webapp, you need to create a sample bundle where you will add and deploy your gadget. This procedure walks you through steps to create a very simple gadget called Hello World.
Add a very basic
pom.xmlfile to your new Maven project as follows:<project xmlns="http://maven.apache.org/POM/4.0.0" xmlns:xsi="http://www.w3.org/2001/XMLSchema-instance" xsi:schemaLocation="http://maven.apache.org/POM/4.0.0 http://maven.apache.org/maven-v4_0_0.xsd">
<modelVersion>4.0.0</modelVersion>
<groupId>sample</groupId>
<artifactId>gadget</artifactId>
<packaging>war</packaging>
<version>1.0</version>
<name>Hello Gadget sample</name>
<build>
<finalName>hello-gadget</finalName>
</build>
</project>
Add a very basic
web.xmlfile to thesrc/main/webapp/WEB-INFdirectory of your project:<?xml version="1.0" encoding="UTF-8"?>
<web-app version="3.0" metadata-complete="true"
xmlns="http://java.sun.com/xml/ns/javaee" xmlns:xsi="http://www.w3.org/2001/XMLSchema-instance"
xsi:schemaLocation="http://java.sun.com/xml/ns/javaee http://java.sun.com/xml/ns/javaee/web-app_3_0.xsd">
<display-name>hello-gadget</display-name>
</web-app>
Add the following content to the
HelloGadget.xmlunder thesrc/main/webapp/gadgets/HelloGadgetdirectory:<?xml version="1.0" encoding="UTF-8"?>
<Module>
<ModulePrefs author="eXoPlatform"
title="Hello World"
directory_title="Hello World"
description="The simplest gadget">
</ModulePrefs>
<Content type="html">
<![CDATA[
<div class='hello'>
<h2>Hello</h2>
<h6>Welcome to Hello World gadget!</h6>
<p><i>Powered by eXo Platform.</i></p>
</div>
]]>
</Content>
</Module>
Add the following content to the
gadget.xmlfile under thesrc/main/webapp/WEB-INFdirectory:<gadgets
xmlns:xsi="http://www.w3.org/2001/XMLSchema-instance"
xsi:schemaLocation="http://www.gatein.org/xml/ns/gatein_objects_1_0 http://www.gatein.org/xml/ns/gadgets_1_0"
xmlns="http://www.gatein.org/xml/ns/gadgets_1_0">
<gadget name="HelloGadget">
<path>/gadgets/HelloGadget/HelloGadget.xml</path>
</gadget>
</gadgets>
Create the target war with the Maven command:
mvn clean install.Add the context name of the gadget war to
$PLATFORM_TOMCAT_HOME/lib/custom-extension-config.jar!/conf/configuration.xml.<?xml version="1.0" encoding="UTF-8"?>
<configuration xmlns:xsi="http://www.w3.org/2001/XMLSchema-instance"
xsi:schemaLocation="http://www.exoplatform.org/xml/ns/kernel_1_2.xsd http://www.exoplatform.org/xml/ns/kernel_1_2.xsd"
xmlns="http://www.exoplatform.org/xml/ns/kernel_1_2.xsd">
<external-component-plugins>
<!-- The full qualified name of the PortalContainerConfig -->
<target-component>org.exoplatform.container.definition.PortalContainerConfig</target-component>
<component-plugin>
<!-- The name of the plugin -->
<name>Change PortalContainer Definitions</name>
<!-- The name of the method to call on the PortalContainerConfig in
order to register the changes on the PortalContainerDefinitions -->
<set-method>registerChangePlugin</set-method>
<!-- The full qualified name of the PortalContainerDefinitionChangePlugin -->
<type>org.exoplatform.container.definition.PortalContainerDefinitionChangePlugin</type>
<init-params>
<value-param>
<name>apply.default</name>
<value>true</value>
</value-param>
<object-param>
<name>change</name>
<object
type="org.exoplatform.container.definition.PortalContainerDefinitionChange$AddDependencies">
<!-- The list of name of the dependencies to add -->
<field name="dependencies">
<collection type="java.util.ArrayList">
...
<!-- The context name of gadget which is configured in the <display-name> tag of web.xml -->
<value>
<string>hello-gadget</string>
</value>
...
</collection>
</field>
</object>
</object-param>
</init-params>
</component-plugin>
</external-component-plugins>
</configuration>
Restart the server, then deploy it in the application server by copying the generated web archive
hello-gadget.war, from the target folder into the deployment folder where you unpacked the eXo Platform installation.Go to the Application Registry and click the Import Applications button. The new gadget will be added:
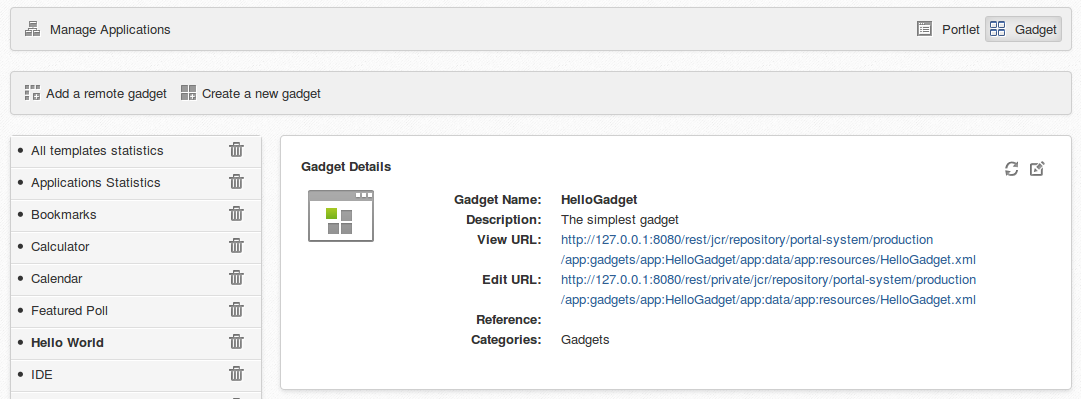
Go to the Dashboard to insert the gadget in the page. Open the Dashboard Workspace by clicking the Add Gadgets link and choose the Hello World gadget. The result is as below:

Note
Besides creating a gadget through a Webapp, you can also perform through UI.