Registering your service to portal container
A service (also called component) can be any Java class. At minimum you write an empty interface, and an implementation with a constructor.
public interface MyService {

  ...

}
public class MyServiceImpl implements MyService {

  ...

  public MyServiceImpl() throws Exception {

    ...

  }

}
In your custom-extension.war!/WEB-INF/conf/portal/configuration.xml:
<configuration>

    <component>

        <key>acme.com.services.MyService</key>

        <type>acme.com.services.MyServiceImpl</type>

    </component>

</configuration>
Then to access the service:
MyService service = (MyService) PortalContainer.getInstance().getComponentInstanceOfType(MyService.class)
You should learn more about service, initial parameter and plugin and all about service configuration in Service configuration for beginners and Service configuration in details.
The service org.exoplatform.services.resources.LocaleConfigService is responsible for adding supported languages.
The service is configured to read a list of locales from a file:
<component>

    <key>org.exoplatform.services.resources.LocaleConfigService</key>

    <type>org.exoplatform.services.resources.impl.LocaleConfigServiceImpl</type>

    <init-params>

        <value-param>

            <name>locale.config.file</name>

            <value>war:/conf/common/locales-config.xml</value>

        </value-param>

    </init-params>

</component>
So by default it is portal.war!/conf/common/locales-config.xml.
To add a locale you want, include a modified copy of this file in your extension:
custom-extension.war!/conf/common/locales-config.xml.
Of course the language support involves translating lots of resources. For now you just add a locale like ve (for Venda), so a user can choose it in the list of language options, but no resource would be found for Venda, then the default language will be used.
<locales-config>

    ...

    <locale-config>

        <locale>ve</locale>

        <output-encoding>UTF-8</output-encoding>

        <input-encoding>UTF-8</input-encoding>

        <description>Venda</description>

    </locale-config>

    ...

</locales-config>
The LoginServlet dispatches the login request to login.jsp:
getServletContext().getRequestDispatcher("/login/jsp/login.jsp").include(req, resp);
This login page is firstly defined in portal webapp but then is overridden by platform-extension. In other words, you can find the login page at:
portal.war!/login/jsp/login.jsp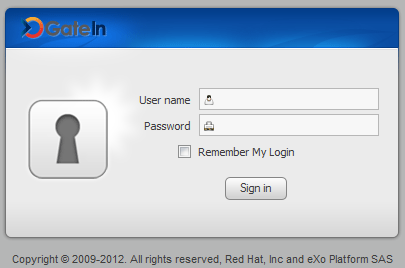
platform-extension.war!/login/jsp/login.jsp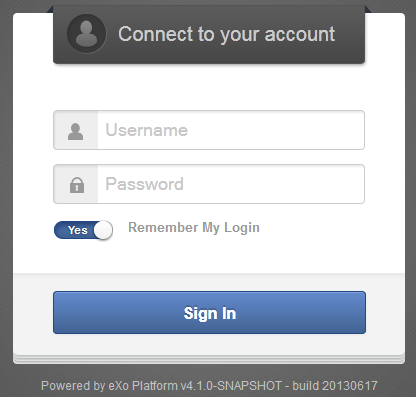
You can override it once again in your portal extension, for example custom-extension.war!/login/jsp/login.jsp.
The shared layout is applied for all pages of a portal.
You can override this resouce by including it in your extension custom-extension.war!/WEB-INF/conf/portal/portal/sharedlayout.xml.
Some of customizations you can do with shared layout:
Remove a built-in portlet from the top navigation bar (for example, the "Help" link).
Adding your portlet here so that all your pages will have that portlet.
See Customizing a shared layout for more instructions.