AJAX allows your gadget to be updated asynchronously by exchanging small amounts of data with the server behind the scenes. Besides, with the support of HTML DOM Object, the gadget's content can be created dynamically based on AJAX's response data. This section instructs you how to leverage these utilities to customize your gadget. You can download the source code of this gadget here.
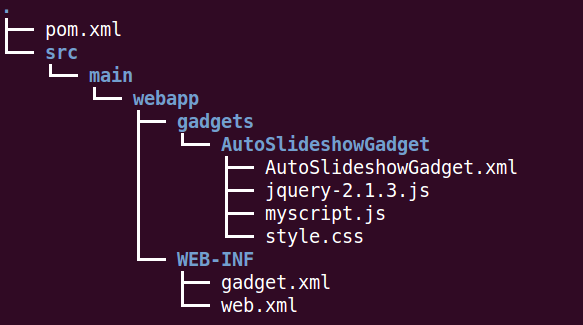
In the next steps, we are going to create a new Maven project with the following structure:
Create a basic
pom.xmlfile and configure your gadget's name as auto-slideshow as follows:<project xmlns="http://maven.apache.org/POM/4.0.0" xmlns:xsi="http://www.w3.org/2001/XMLSchemainstance"
xsi:schemaLocation="http://maven.apache.org/POM/4.0.0 http://maven.apache.org/maven-v4_0_0.xsd">
<modelVersion>4.0.0</modelVersion>
<groupId>sample</groupId>
<artifactId>gadget</artifactId>
<packaging>war</packaging>
<version>1.0</version>
<name>Auto slideshow gadget sample</name>
<build>
<finalName>auto-slideshow</finalName>
</build>
</project>
Add this
web.xmlfile to thesrc/main/webapp/WEB-INFdirectory of your project:<?xml version="1.0" encoding="UTF-8"?>
<web-app version="3.0" metadata-complete="true"
xmlns="http://java.sun.com/xml/ns/javaee" xmlns:xsi="http://www.w3.org/2001/XMLSchema-instance"
xsi:schemaLocation="http://java.sun.com/xml/ns/javaee http://java.sun.com/xml/ns/javaee/web-app_3_0.xsd">
<display-name>auto-slideshow</display-name>
</web-app>
Create a file named
AutoSlideshowGadget.xmlundersrc/main/webapp/gadgets/AutoSlideshowGadget. This file only contains a simple UI for your gadget.<?xml version="1.0" encoding="UTF-8" ?>
<Module>
<ModulePrefs title="Memories!" width="240" height="200"/>
<Content type="html">
<![CDATA[
<!--Gadget's main body which will be added by HTML DOM Object later-->
<div id="slideshow">
</div>
]]>
</Content>
</Module>
Where you named this gadget as Memories! and its main body consists of a div tag only.
Go to http://code.jquery.com/jquery-2.1.3.js to download this version of JQuery and save it into
src/main/webapp/gadgets/AutoSlideshowGadget/.Create a CSS file named
style.cssand put it in the same folder, with the following content:img {width: 240px;
}
#slideshow {
margin: 10px auto 10px;
position: relative;
width: 240px;
height: 200px;
padding: 10px;
box-shadow: 0 0 20px rgba(0,0,0,0.4);
}
#slideshow > div {
position: absolute;
top: 10px;
left: 10px;
right: 10px;
bottom: 10px;
}Create a Javascript file named
myscript.jsand place it intosrc/main/webapp/gadgets/AutoSlideshowGadget. This file contains a function using AJAX to call DriverConnector API (see here for more details) to get all public images of root user. Notice the traverseXMLDoc function will be created in next steps.function getImages() {
//This function uses AJAX to send GET request to server's DriverConnector API and receive XML response
jQuery.ajax({
type: "GET",
url: "/portal/rest/wcmDriver/getFoldersAndFiles?driverName=Collaboration¤tFolder=Users/r___/ro___/roo___/root/Public¤tPortal=intranet&repositoryName=repository&workspaceName=collaboration&filterBy=Image",
contentType: "application/xml; charset=utf-8",
dataType: "xml",
success: function (data, status, jqXHR) {
var strResults=new XMLSerializer().serializeToString(data.documentElement);
//build dynamic html content for "slideshow" div tag
traverseXMLDoc(strResults, "slideshow");
},
//error report
error: function (jqXHR, status) {
// error handler
alert("Cannot retrieve data!");
}
});
}
Note
Notice the
urlparameter here is pointing to Public folder of root user to retrieve image files. Therefore, in steps 13-15, it requires logging in as root user to upload image before anyone can use this gadget.Add the traverseXMLDoc function with 2 input parameters to this file as follows:
function traverseXMLDoc(xmlDoc, idOfContainerDomElement){

    //This function traverses through the whole XML response returned from server


        var $xmlDocObjChildren, $contentDiv;

        $contentDiv = $('#' + idOfContainerDomElement);

        if ($contentDiv.length === 0) {

            throw new Error('There are no DOM elements with this id: "' + idOfContainerDomElement + '"');

        }

        //Information of each image object is contained in "File" tag

        $xmlDocObjChildren = $(xmlDoc).find("File");

        $xmlDocObjChildren.each(function(index, Element) {

        var $currentObject = $(this),

            childElementCount = Element.childElementCount,

            //Image's url is contained in "url" attribute

            currentNodeType = $currentObject.attr('url');


        //Adding dynamic content into gadget's body

        $contentDiv.append('<div><img src="'+currentNodeType+'"></div>');

        });

    }
Add some image effects by Javascript into your gadget and include all your created content into the
AutoSlideshowGadget.xmlfile undersrc/main/webapp/gadgets/AutoSlideshowGadget/to have this script:<?xml version="1.0" encoding="UTF-8" ?>
<Module>
<ModulePrefs title="Memories!" width="240" height="200"/>
<Content type="html">
<![CDATA[
<!--Including JQuery library-->
<script src="jquery-2.1.3.js"></script>
<!--Including your own js script-->
<script src="myscript.js"></script>
<!--Defining style for gadget-->
<link rel="stylesheet" type="text/css" href="style.css" />
<!--Gadget's main body which will be added by HTML DOM Object later-->
<div id="slideshow">
</div>
<!--Start calling js function-->
<script type="text/javascript">
getImages();
//Creating gagdet's effects
$("#slideshow > div:gt(0)").hide();
setInterval(function() {
$('#slideshow > div:first')
.fadeOut(1000)
.next()
.fadeIn(1000)
.end()
.appendTo('#slideshow');
}, 3000);
</script>
]]>
</Content>
</Module>
Notice that you can follow this section to create CSS and Javascript resources in separate files to share with other gadgets. In this guide, we make it simple by including these resources right inside the war package.
Add the following content to the
gadget.xmlfile under thesrc/main/webapp/WEB-INFdirectory:<gadgets
xmlns:xsi="http://www.w3.org/2001/XMLSchema-instance"
xsi:schemaLocation="http://www.gatein.org/xml/ns/gatein_objects_1_0 http://www.gatein.org/xml/ns/gadgets_1_0"
xmlns="http://www.gatein.org/xml/ns/gadgets_1_0">
<gadget name="AutoSlideshowGadget">
<path>/gadgets/AutoSlideshowGadget/AutoSlideshowGadget.xml</path>
</gadget>
</gadgets>
Create the target war with the Maven command:
mvn clean install.Add the context name of the gadget war (auto-slideshow) to
$PLATFORM_TOMCAT_HOME/lib/custom-extension-config.jar!/conf/configuration.xml.<?xml version="1.0" encoding="UTF-8"?>
<configuration xmlns:xsi="http://www.w3.org/2001/XMLSchema-instance"
xsi:schemaLocation="http://www.exoplatform.org/xml/ns/kernel_1_2.xsd http://www.exoplatform.org/xml/ns/kernel_1_2.xsd"
xmlns="http://www.exoplatform.org/xml/ns/kernel_1_2.xsd">
<external-component-plugins>
<!-- The full qualified name of the PortalContainerConfig -->
<target-component>org.exoplatform.container.definition.PortalContainerConfig</target-component>
<component-plugin>
<!-- The name of the plugin -->
<name>Change PortalContainer Definitions</name>
<!-- The name of the method to call on the PortalContainerConfig in
order to register the changes on the PortalContainerDefinitions -->
<set-method>registerChangePlugin</set-method>
<!-- The full qualified name of the PortalContainerDefinitionChangePlugin -->
<type>org.exoplatform.container.definition.PortalContainerDefinitionChangePlugin</type>
<init-params>
<value-param>
<name>apply.default</name>
<value>true</value>
</value-param>
<object-param>
<name>change</name>
<object
type="org.exoplatform.container.definition.PortalContainerDefinitionChange$AddDependencies">
<!-- The list of name of the dependencies to add -->
<field name="dependencies">
<collection type="java.util.ArrayList">
...
<!-- The context name of gadget which is configured in the <display-name> tag of web.xml -->
<value>
<string>auto-slideshow</string>
</value>
...
</collection>
</field>
</object>
</object-param>
</init-params>
</component-plugin>
</external-component-plugins>
</configuration>
Restart the server, then deploy it in the application server by copying the generated web archive
auto-slideshow.war, from the target folder into the deployment folder where you unpacked the eXo Platform installation.Log in as a root user, then select → from the top navigation bar. Here, select Gadget to open the list of gadgets. You will see your new gadget (named Memories!):

Add this gadget into a specific category to bring it in use.
Upload several images into → .
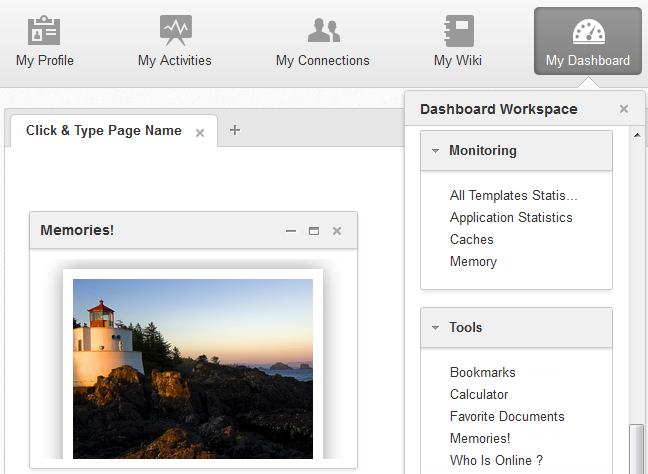
Go to My Dashboard to insert the gadget in the page. Open the Dashboard Workspace by clicking the Add Gadgets link and choose the auto slideshow gadget named Memories!. The result is as below: