Warning
You are looking at documentation for an older release. Not what you want? See the current release documentation.
eXo Platform provides the standalone mode to install eXo Chat into a dedicated server. In this mode, the backend of eXo Chat application is deployed in its own Tomcat application server while the frontend i.e. the portlets are deployed in eXo Platform instance.
This alternative architecture brings better scalability and performance since server resources are not shared between eXo Platform and eXo Chat. It allows to add more eXo Chat server nodes independently from eXo Platform nodes.
The schema below summaries the standalone mode architecture:
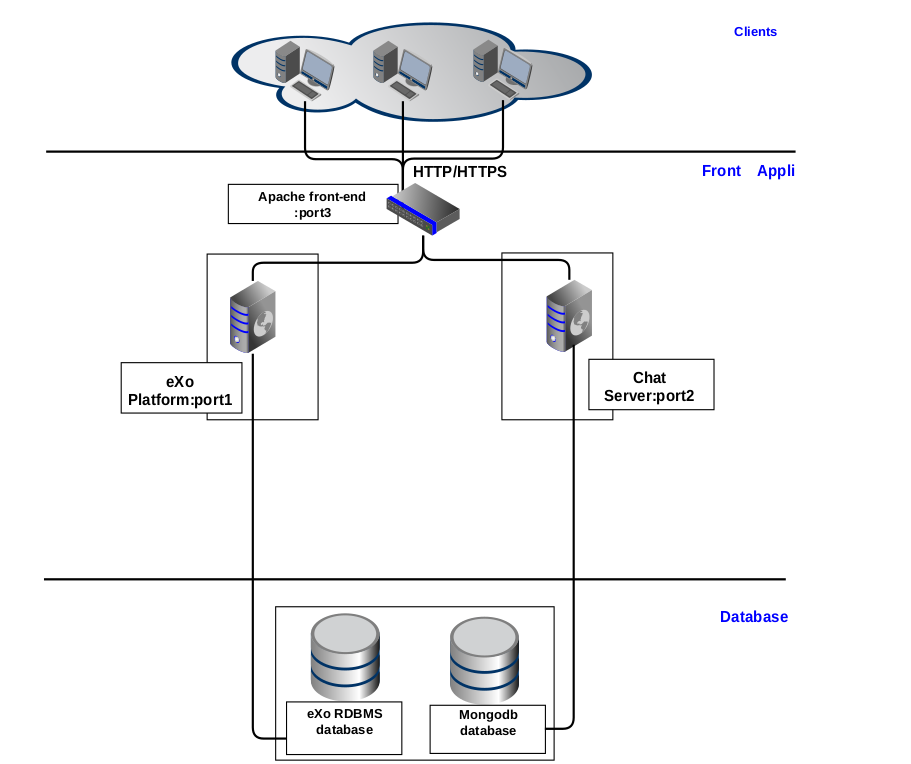
To install eXo Chat in standalone mode, follow this procedure:
Ensure to uninstall eXo Chat from eXo Platform server if it is already installed by the Addon manager: addon uninstall exo-chat
Download eXo Chat package: chat-standalone-server-packaging into a known location and rename it to chat_server_package.
The package
chat_server_packagecontains these files:exo-chat-standalone-application-x.y.z.zipcontaining the files:chat-services.jar,chat-extension.war,chat-common.jarandchat.war.exo-chat-standalone-server-x.y.z.zipcontaining the warchatServer.warchat-sample.properties
Install and configure MongoDB database by following this link.
Configure chat server on Tomcat by following these steps:
Install the latest update of Apache Tomcat 7 and rename it to chat-server.
Change the
server.xmlfile to use the port 8280:
<Connector port="8280" protocol="HTTP/1.1"

               connectionTimeout="20000"

               redirectPort="8243" URIEncoding="UTF-8" />

               ....
Note
Make sure there is no port conflicts between the eXo Chat server and other systems. If you deploy the eXo Chat server on the same host than eXo Platform, then, you should change all the ports as in the example above.
Deploy chat application in Apache tomcat by copying the following files:
Copy the war file
chatServer.warfromchat_server_package/exo-chat-standalone-server-x.y.ztochat-server/webapps/folder.Copy
chat-sample.propertiestochat-server/conf/folder and rename it tochat.properties.Adapt the configuration file
chat.propertiesto fit with your environments by updating the following properties:standaloneChatServer=true dbServerHost=[MongoDB-Host] dbServerPort=[MongoDB-Port] dbName=chat dbAuthentication=false dbUser=admin dbPassword=pass chatPortalPage=/portal/intranet/chat chatPassPhrase=change-me
Start the chat server:
cd  chat-server
./bin/catalina.sh run
Install Chat application into eXo Platform server : ./addon install exo-chat-client
Configure these properties in
eXo_tomcat/conf/eXo_tomcat/conf/:standaloneChatServer=true chatServerBase=http://[chat-server-IP-address]:8280 chatPortalPage=/portal/intranet/chat chatIntervalSession=60000 chatPassPhrase=change-me
Start eXo Platform server:
cd eXo_tomcat
./start_eXo.sh
Install a frontal server and configure it to redirect Chat server requests to the right server. Below an example of an Apache2 configuration file (It should be adapted according to your environment):
<VirtualHost *:80>

    ErrorLog /var/log/apache2/error.log

    CustomLog /var/log/apache2/access.log combined

    #Put your used ServerName

    ServerName www.domainexo.com


     <Proxy *>

        Order deny,allow

        Allow from all

     </Proxy>


     <IfModule proxy_wstunnel_module>


ProxyPass /chatServer/cometd ws://localhost:8280/chatServer/cometd  max=100 acquire=5000   retry=5 disablereuse=on flushpackets=on

ProxyPass /cometd  ws://localhost:8080/cometd/ max=100 acquire=5000 retry=5  disablereuse=on flushpackets=on


     </IfModule>


     ProxyPass /chatServer  http://localhost:8280/chatServer

     ProxyPassReverse /chatServer http://localhost:8280/chatServer

     ProxyPassReverse /chatServer/cometd/  ws://localhost:8280/chatServer/cometd/


     ProxyPassReverse /cometd  ws://localhost:8080/cometd/

     ProxyPass / http://localhost:8080/

     ProxyPassReverse / http://localhost:8080/


     ProxyRequests Off

     ProxyPreserveHost On

</VirtualHost>
Login to the platform using this url http://www.domainexo.com:80/portal/intranet/, you should have the chat application in the top navigation menu.
Integrating Video Calls
If you want to allow users to make video calls within Chat:
Install Video Calls add-on, then configure the key and grant permissions, as detailed in Server setup, Video Calls.
Note
Notice the cam icon that is added next to the Chat icon. The different colors of the cam icon allow administrators and users to check the Video Calls status.
 Connected to the service.
 Connecting to the service.
 Connected with the same account on two different places.
 Not connected to the service.
To activate the conference call, remember to purchase a key for Group Calls, and enable the Group Calls button (YES) for the users/groups you want to grant the Call permission.
