Warning
You are looking at documentation for an older release. Not what you want? See the current release documentation.
You have created your new template, and used it on a page. Now, you should add more interesting codes to the template to really loop over the content based on the portlet configuration. But before this, you need to understand caching and code modification.
eXo Template and Cache
To improve performance of a running system, the compiled version of the template is cached by default. This is the reason why you do not see any changes when you are modifying a template. There are 2 ways to work around this:
Run eXo Platform in the Dev mode as follows:
Linux and OS X: start_eXo.sh --dev
Windows: start_eXo.bat --dev
The --dev option allows disabling the cache, so nothing is cached in this case.
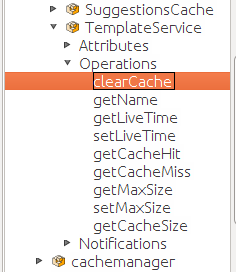
If you do not want to disable the cache (for example, to test your developments in real conditions), you can use JMX with your favorite JMX browser (jconsole, VisualVM, and more) to invalidate the cache manually. For example, you can use the MBean for invalidating the Template Service cache:
exo:portal=portal,service=cache,name=TemplateService.
Then, call the clearCache operation on it.

Note
Do not forget to call this operation each time you modify your template to ensure that eXo Platform recompiles the template.
Accessing content in the template
The template used by the Content List portlet is based on the following JAVA class: org.exoplatform.wcm.webui.clv.UICLVPresentation.
This class is responsible for setting the complete context that you can use in the template, such as:
The folder or category that contains the content to show. The Folder Path field is in the preference screen.
The display settings: title, number of documents, elements to show, and more.
Here is the code to access these preferences:
// import all the classes need in the template

import javax.jcr.Node;

import org.exoplatform.wcm.webui.paginator.UICustomizeablePaginator;

import org.exoplatform.wcm.webui.clv.UICLVPortlet;

import org.exoplatform.wcm.webui.Utils;

import org.exoplatform.services.wcm.core.NodeLocation;


// get the portlet preferences


    def header = uicomponent.getHeader();

    def isShowRssLink = uicomponent.isShowRssLink();

    def isShowHeader = uicomponent.isShowField(UICLVPortlet.PREFERENCE_SHOW_HEADER);

    def isShowRefresh = uicomponent.isShowField(UICLVPortlet.PREFERENCE_SHOW_REFRESH_BUTTON);


    def isShowTitle = uicomponent.isShowField(UICLVPortlet.PREFERENCE_SHOW_TITLE);

    def isShowDate = uicomponent.isShowField(UICLVPortlet.PREFERENCE_SHOW_DATE_CREATED);

    def isShowLink = uicomponent.isShowField(UICLVPortlet.PREFERENCE_SHOW_LINK);

    def isShowReadmore = uicomponent.isShowField(UICLVPortlet.PREFERENCE_SHOW_READMORE);

    def isShowImage = uicomponent.isShowField(UICLVPortlet.PREFERENCE_SHOW_ILLUSTRATION) ;

    def isShowSummary = uicomponent.isShowField(UICLVPortlet.PREFERENCE_SHOW_SUMMARY);
Templates use several available implicit variables, such as:
uicomponent: This object holds all the context. It can be used to retrieve the portlet preferences, get the information of a showing node, and more._ctx: This object is an instance oforg.exoplatform.webui.application.WebuiRequestContext. It can be used to get i18N, get an instance oforg.exoplatform.web.application.JavascriptManager, get session Id, and more.
The
uicomponent
object is defined by the container class of the portlet that calls the template. This class
contains many
utility
methods. The code above retrieves all the preferences of the portlet. Because the name is
self-explanatory,
it is
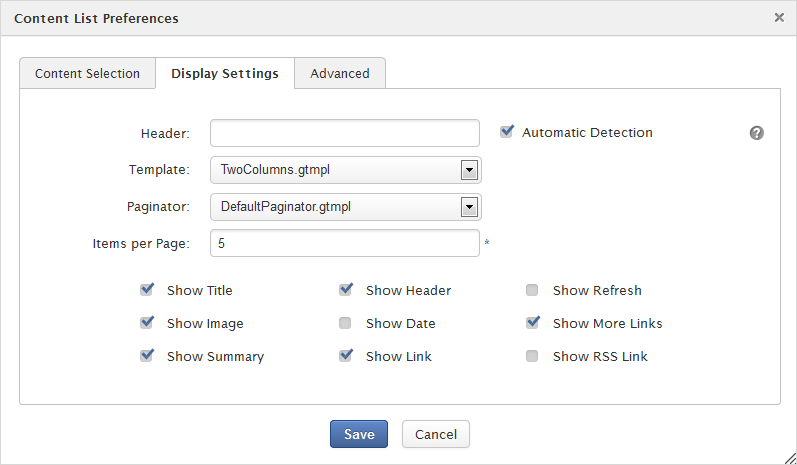
not necessary to detail them, especially when you look at the preferences screen below:

Now, the template has all the preferences, it is time to loop on the content to display the information.
The Content Service provides API to manipulate the content, including pagination of content. The idea behind this is to let the Content Service manage the JCR query, sorting, caching and paginating data. So in your template, you will mainly manage 2 classes to loop through the content to show:
uicomponent.getUIPageIterator()- a paginator object that is configured based on the portlet preferences.uicomponent.getCurrentPageData()- a list of the content (JCR Nodes) that should be displayed on the current page.
So, you can display all the content of the page as a simple HTML list:
<ul style="margin: 20px">
 <%
    for (viewNode in uicomponent.getCurrentPageData()) {
    def title = viewNode.getProperty("exo:title").getString()
    print("<li>$title</li>");
    }
 %>
 </ul>
Just copy this code to your template, save it, then refresh the cache and go to your page. You should see the list of the content in a simple HTML list.
The uicomponent
object provides a lot of methods to interact with the content, and use the Content API under the hood.
In the following code, you can see the most important methods accessing the content properties:
def itemName = viewNode.getName();

    def itemLink = uicomponent.getURL(viewNode);

    def webdDavLink = uicomponent.getWebdavURL(viewNode);

    def itemDateCreated = uicomponent.getCreatedDate(viewNode);

    def itemModifiedDate = uicomponent.getModifiedDate(viewNode);

    def itemOwner = uicomponent.getAuthor(viewNode);

    def imgSrc = uicomponent.getIllustrativeImage(viewNode);

    def itemTitle = uicomponent.getTitle(viewNode);

    def itemSummary = uicomponent.getSummary(viewNode);
One important point is the fact that these methods are responsible for many things (for example, formatting dates, returning complete URLs) that depends on the context of the portlet.
Based on these methods, you can now work on the presentation of the information on the page. For example, you can click the image and the title to go in the detailed view of the article. This is done simply by using the following code:
<%

      for (viewNode in uicomponent.getCurrentPageData()) {

        def itemName = viewNode.getName();

        def itemLink = uicomponent.getURL(viewNode);

        def webdDavLink = uicomponent.getWebdavURL(viewNode);

        def itemDateCreated = uicomponent.getCreatedDate(viewNode);

        def itemModifiedDate = uicomponent.getModifiedDate(viewNode);

        def itemOwner = uicomponent.getAuthor(viewNode);

        def imgSrc = uicomponent.getIllustrativeImage(viewNode);

        def itemTitle = uicomponent.getTitle(viewNode);

        def itemSummary = uicomponent.getSummary(viewNode);


        %>

    <div style="overflow: auto;">

      <img src="$imgSrc" align="left">

      <h3><a href="$itemLink">$itemTitle</a></h3>

      $itemSummary

    </div>


    <%

      }

    %>
For the simplicity reason, this code does not manage any null value. Also, the template does not deal with the portlet preferences, such as the "Header", "RSS" links. The website should look like:

The last important point is to add the support for the in-context editing that allows users to edit the
content directly from the template by adding the 15 (
<%=uicomponent.addQuickEditDiv("MyTemplateContentEditor", viewNode)%>)
and 19 (</div>)
lines to your template.
This is also done with a method of the
uicomponent
object that creates a DIV around the content:
<%

      for (viewNode in uicomponent.getCurrentPageData()) {

        def itemName = viewNode.getName();

        def itemLink = uicomponent.getURL(viewNode);

        def webdDavLink = uicomponent.getWebdavURL(viewNode);

        def itemDateCreated = uicomponent.getCreatedDate(viewNode);

        def itemModifiedDate = uicomponent.getModifiedDate(viewNode);

        def itemOwner = uicomponent.getAuthor(viewNode);

        def imgSrc = uicomponent.getIllustrativeImage(viewNode);

        def itemTitle = uicomponent.getTitle(viewNode);

        def itemSummary = uicomponent.getSummary(viewNode);


        %>

    <div style="overflow: auto;">

      <%=uicomponent.addQuickEditDiv("MyTemplateContentEditor", viewNode)%>

      <img src="$imgSrc" align="left">

      <h3><a href="$itemLink">$itemTitle</a></h3>

      $itemSummary

      < /div>

    </div>


    <%

      }

    %>
After creating your own template for Content Service, you are free to use your imagination for adding cool features to your site.