Warning
You are looking at documentation for an older release. Not what you want? See the current release documentation.
To share a document in the Documents application, do as follows:
Click Documents on the left panel, you will be redirected to the Documents interface.
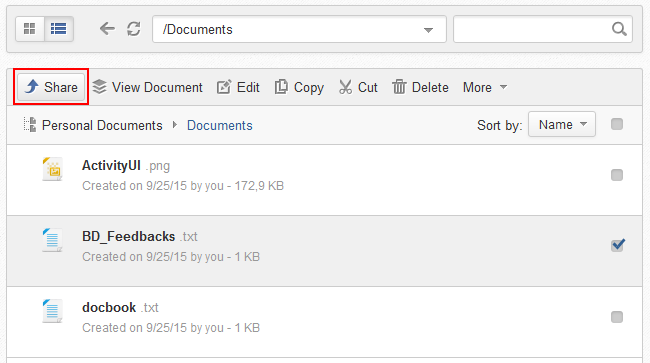
Select any document that you would like to share. If you are in the List view, a Share button will appear in the Actions bar:
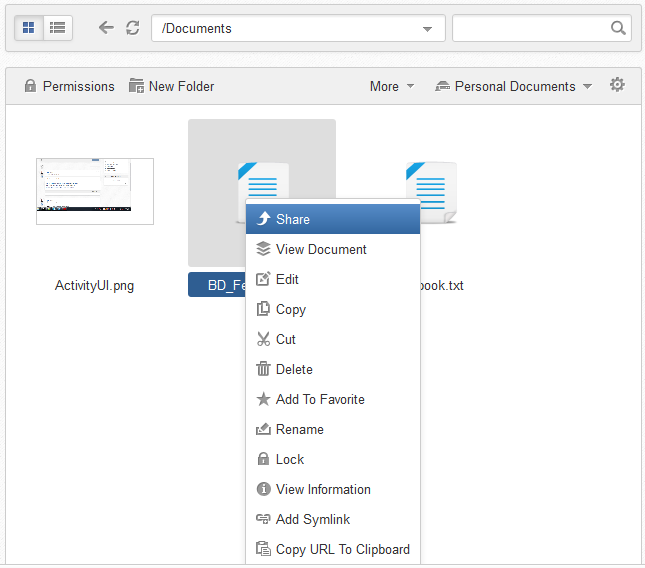
In case you are in the Icons view, right-click on the document to see the Share button in the drop-down menu:
Note
Only one file can be shared at a time, so you will not see the Share button if you choose more than one file simultaneously.
Click on the Share button, you will see a sharing dialog.

Type the first letter from the username/space to which you wish to share the document. A drop-down list with the names of users and spaces having that letter appears.

Select the users/spaces to which you want to share the document.
Select the permission, you can choose either can view, either can edit:
Can View: space members can only read the file.
Can Edit: space members can read and modify the file.
By default, the Can View permission will be applied.
Note
If you do not have the Can Edit permission on this document, only the Can View right is available for setting permissions.
Cick on add button
 to add the access right to the section Who has access.
The Who has access section contains the list of spaces/users with whom the document is shared and the persmission they have on it.
This list is sorted as follows:
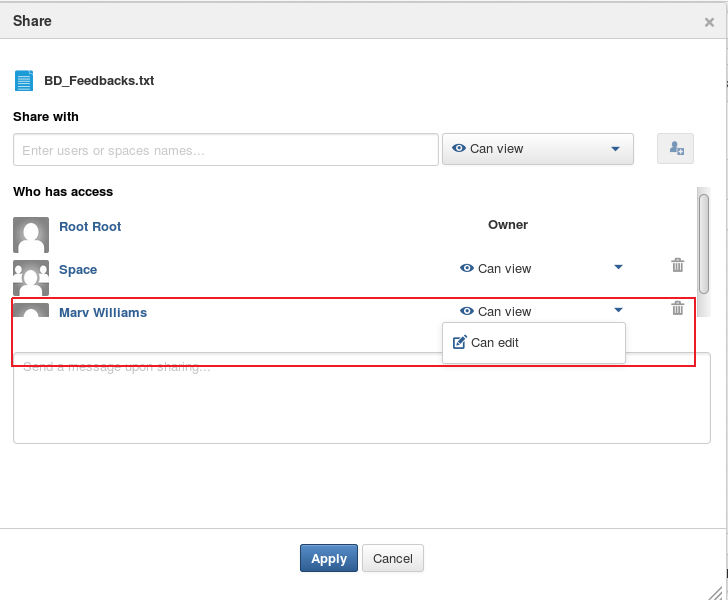
The first entry of the list is the owner of the document, it cannot be removed.
When the document's owner validates to add new users/spaces with the corresponding permission, these contacts will be added in the bottom of the Who has access list, and the list view will be pointing to the last contact added.
Other entries are displayed in a scrollable area. Each entry contains : share target (user or space), permission (can edit or can view) and a delete icon.
Note
If the user enters a username that is not valid, the add button
 is not highlited and the user could not been added to the who has access list.
Add some comments or descriptions about the shared document into the succeeding text box.
Click to finish sharing this document with the selected spaces or to skip sharing.
Note
After a document is shared successfully, a symlink will be created in the destination spaces and put into a folder named Shared in the Documents folder (if the folder does not exist in these spaces, it will be automatically generated while sharing a file). Therefore, the document could be shared again by any member of these spaces.
This sharing activity will be automatically updated on the Activity Stream. Refer to Sharing via Activity Composer for more details.
If the original file is deleted, all its associated symlinks in all spaces will be removed.