Warning
You are looking at documentation for an older release. Not what you want? See the current release documentation.
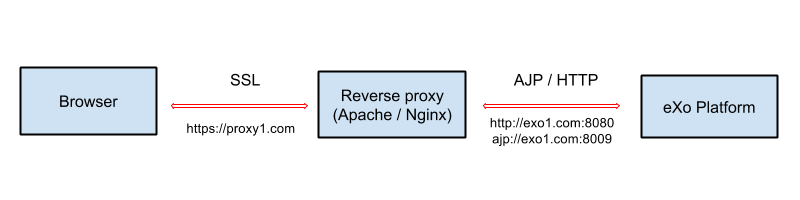
Apache or Nginx can both be used as a reverse proxy in front of eXo Platform. The role of the reverse proxy server is to catch HTTPS requests coming from the http clients (e.g web browsers) and to relay them to eXo Platform either via AJP or via HTTP protocol. The following diagram depicts the case described in this section:
Note
At this stage, we assume you already have an SSL certificate, either issued by an official certification authority or self-signed (for testing).
The examples below will let you setup a basic installation with ssl enabled. You should fine tune your installation before opening it on the web. Mozilla provide a great site to help you to find a configuration adapted to your needs.
Before you start, note that for clarity, not all details of the Apache server configuration are described here. The configuration may vary depending on Apache version and your OS, so consult Apache documentation if you need.
Note
The supported version of Apache is 2.4 which should be used in a supported version of OS. You can learn more about supported environments here.
Required modules
You need mod_ssl, mod_proxy. They are all standard Apache2 modules, so no installation is required. You just need to enable them with the following command:
sudo a2enmod ssl proxy proxy_http headers
Configuring a virtual host for the SSL port
Add this to site configuration (you can override the default ssl site /etc/apache2/sites-enabled/default-ssl.conf or create your own site):
<VirtualHost *:80>
    ServerName proxy1.com
    Redirect / https://proxy1.com/
</VirtualHost>

<VirtualHost *:443>
    ServerName proxy1.com
    ProxyPass / http://exo1.com:8080/
    ProxyPassReverse / http://exo1.com:8080/
    ProxyRequests Off
    ProxyPreserveHost On
    RequestHeader set "X-Forwarded-Proto" expr=%{REQUEST_SCHEME}

    ProxyPass /cometd ws://exo1.com:8080/cometd max=200 acquire=5000 retry=5 disablereuse=on flushpackets=on

    SSLEngine On
    SSLCertificateFile /path/to/folder/from/certificate/cert.pem
    SSLCertificateKeyFile /path/to/folder/from/certificate/cert-key.pem
</VirtualHost>
Instructions for installing Nginx can be found here. On Debian and Ubuntu you can install Nginx with the following command: apt-get install nginx.
Configure the server proxy1.com at port 443 like this
(you can put the configuration in a file like /etc/nginx/sites-enabled/proxy1.com):
server {
    listen 80;
	server_name proxy1.com;

    # Redirect all HTTP requests to HTTPS with a 301 Moved Permanently response.
    return 301 https://$host$request_uri;
}

server {
	listen 443;
	server_name proxy1.com;
	ssl on;
	ssl_certificate /path/to/file/mycert.pem;
	ssl_certificate_key /path/to/file/mykey.pem;

	location / {
		proxy_pass http://exo1.com:8080;
	}
	location /cometd/cometd {
		proxy_pass http://exo1.com:8080;
		proxy_http_version 1.1;
		proxy_set_header Upgrade $http_upgrade;
		proxy_set_header Connection "upgrade";
	}

}
The configuration here is a simple one and it works. For a more advanced configuration, you may want to read this blog post.
Configuring the HTTP connector
In both eXo Platform Tomcat and JBoss distributions, there is a default HTTP (8080) connector.
In any case, you should configure that connector so that eXo Platform is aware of the proxy in front of it.
In Tomcat
Set the following property in $PLATFORM_TOMCAT_HOME/gatein/conf/exo.properties file:
exo.base.url=https://proxy1.com
The connector is configured in $PLATFORM_TOMCAT_HOME/conf/server.xml. Add proxy parameters like this:
<Connector address="0.0.0.0" port="8080" protocol="org.apache.coyote.http11.Http11NioProtocol"

  enableLookups="false" redirectPort="8443"

  connectionTimeout="20000" disableUploadTimeout="true"

  URIEncoding="UTF-8"

  compression="off" compressionMinSize="2048"

  noCompressionUserAgents=".*MSIE 6.*" compressableMimeType="text/html,text/xml,text/plain,text/css,text/javascript"

  proxyName="proxy1.com" proxyPort="443" scheme="https" />
In JBoss
Set the following property in
$PLATFORM_JBOSS_HOME/standalone/configuration/gatein/exo.propertiesfile:exo.base.url=https://proxy1.com
In
$PLATFORM_JBOSS_HOME/standalone/configuration/standalone-exo.xml, add the propertyproxy-address-forwarding="true"in the configuration ofhttp-listener:<http-listener name="default" redirect-socket="https"
socket-binding="http" max-post-size="209715200"
proxy-address-forwarding="true"/>
After restarting the proxy and eXo Platform, you can test https://proxy1.com.
If you are testing with dummy server names, make sure you created the hosts "proxy1.com" and "exo1.com" in the file /etc/hosts.