Warning
You are looking at documentation for an older release. Not what you want? See the current release documentation.
eXo Platform allows to create new skins. New skins are based on the Default skin. The difference between creating a new skin compared to customizing an existing skin is that the new skin is available besides the Default skin, so a site can use the new skin while another site still use the Default skin.
In order to create a new skin, process as follows:
Create a Maven project from the available sample.
This sample contains a Maven module for the skin extension webapp (sample-skin-webapp) and a Maven module for packaging it as an addon (packaging). It has the following structure:
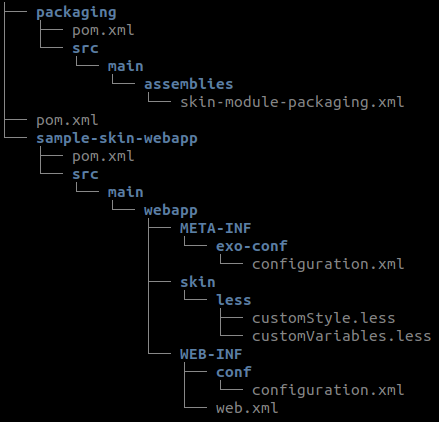
where the important files are:
sample-skin-webapp/src/main/webapp/META-INF/exo-conf/configuration.xml, the extension activation file. The extension name must be adapted.sample-skin-webapp/src/main/webapp/WEB-INF/web.xml. The extension name (display-name) must be adapted.sample-skin-webapp/src/main/webapp/skin/less/customVariables.less, the file to override style variables (see below).sample-skin-webapp/src/main/webapp/skin/less/customStyle.less, the file to define new style (see below).sample-skin-webapp/pom.xml, the build file. The groupId, artifactId, version, exo.skin.name and exo.skin.display.name must be adapted.
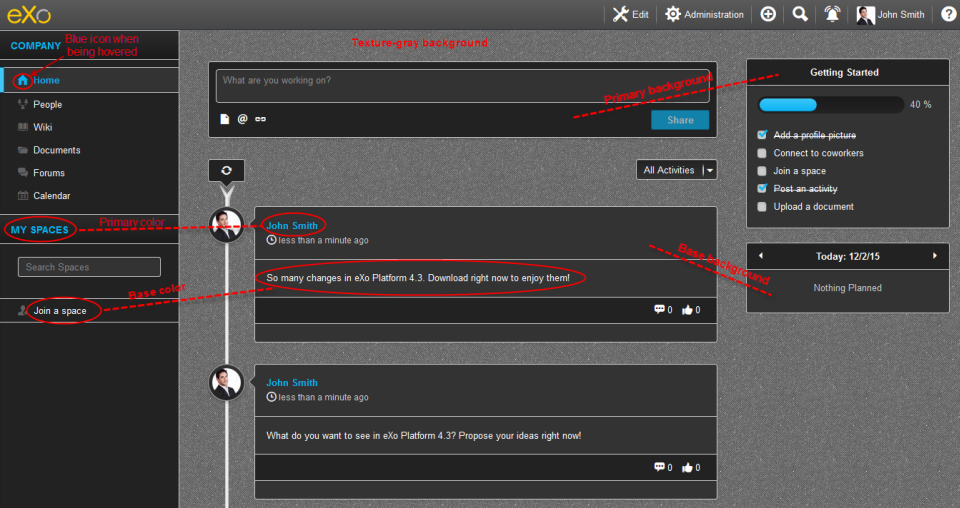
eXo Platform defines a set of style variables which allow to change the default style globally. The complete list is available here. If you want to modify style variables, change the value of any available variable in the file
src/main/webapp/skin/less/customVariables.less. For example:@baseColor: #ffffff; // text color , border color, and other UI elements.. @baseBackground: #333333; // default background , background for content display.... @primaryColor: #0ab5f5; // primary button and link color... @primaryBackground: #222222; // main background such as header popup background, tab items... @colorIconDefault : #fff; // icon color @images-path: "/{YOUR-SKIN-ADDON}/skin/images/themes/default"; @contentBackground: url("@{images-path}/ShareImages/Background/texture-gray.jpg") repeat left top;If you want to go further by defining new CSS classes or by overriding default CSS classes, add them in the file
src/main/webapp/skin/less/customStyle.less. For example:body { background-color: green; }This is a Less file, so you can use all the power of Less syntax.
Testing the new skin
Deploy the addon locally.
Apply the new skin to your site.
i. Start eXo Platform package, and log in with the administrator account.
ii. Go to → → , then click Edit Site Configuration next to one site, for example, Intranet site.
iii. In the Skin drop-down list, select the new skin and click .
Refresh the page and enjoy the new skin.
The current homepage:

The homepage with your applied skin add-on: