Note
You can perform this action only when you are a member of the /platform/administrators group.
Click
 → →
on the top navigation bar, then click
in the
Manage Sites
page;
→ →
on the top navigation bar, then click
in the
Manage Sites
page;
Or, click → → .
By default, the window to create a new site, which contains the Portal Settings tab, will open.

Fill in the Portal Name field. The field is required, unique and must start with a letter. Only alphabetical, numerical, dash and underscore characters are allowed for this field with the length from 3 to 30 characters.
Select the default display language for the site from the Locale field.
Click the Properties tab to set the properties of a site.

Details:
Click the Permission Settings tab to set permissions on the site.
The list of Access permissions for the portal is empty by default. You have to select at least one or tick the Make it public (everyone can access) checkbox to assign the Access permission to everyone.
Note
For more details on how to grant permissions on the site, see Setting permissions on a site.
Click the Portal Templates tab to select the template for your site.
Click to accept creating your new site.
Note
After creating a new site, you can access it via the URL format: http://{domain-name}/portal/[name-site].
For example, accessing the ACME site: http://mycompany.com:8080/portal/acme.
The accessibility subject is quite vast, but we have some guidelines like WCAG 2.0 (Web Content Accessibility Guidelines) and also the RGAA for the French Administration. eXo Platform has been improved to be compliant with these rules. eXo Platform has priority in providing users with a way to create an accessible site and accessible contents regardless of their roles, by using the "Sample Accessible Website" template. This site is accessible without JavaScript enabled on the browser.
To check the compliance of this template, the following tools are used:
W3C validator XHTML 1.0 Transitional
Achecker with the rules of WCAG 2.0 AA
To create an accessible site, simply follow steps described in the Creating a new site section. Next, in the Portal Templates tab, select Sample Accessible Website from the templates list.
Note
The Sample Accessible Website template is available in the Enterprise edition only, so you first should enable this as stated in here.
After creating the accessible site, you can access the site by typing the URL as follows on the address bar of the browser:
For example, the accessible site named "WAI": http://mycompany.com:8080/portal/WAI.
The homepage of the accessible portal appears as below.
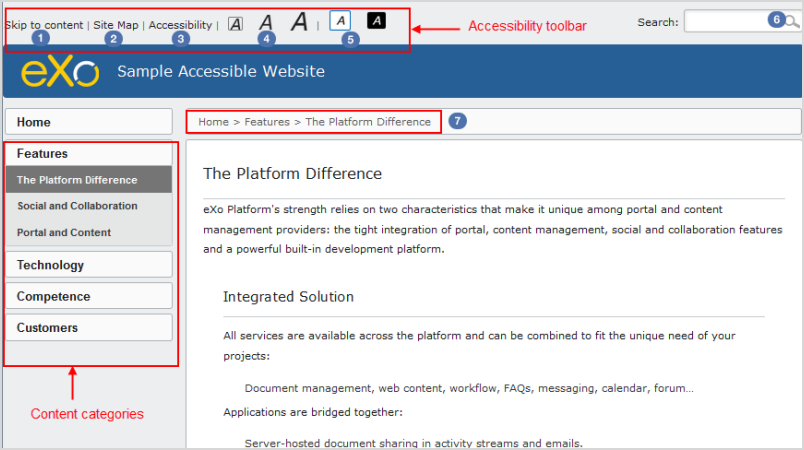
The accessible portal provides you with some following features:
Skip to content
 : Allows you to ignore navigation links, banner, or redundant information, and directly go to the main content of
a page.
: Allows you to ignore navigation links, banner, or redundant information, and directly go to the main content of
a page.
Site map
 : Shows a list of pages of the current template.
Accessibility
 :
Allows you to access a specific page about the accessibility policy. It explains what the accessibility is, how
to navigate into the site, and describes the available features of the accessible portal.
:
Allows you to access a specific page about the accessibility policy. It explains what the accessibility is, how
to navigate into the site, and describes the available features of the accessible portal.
Font size
 : Allows you to select your desired font size, including Normal, Medium, and
Large
sizes. The default size is Normal.
: Allows you to select your desired font size, including Normal, Medium, and
Large
sizes. The default size is Normal.
Color themes
 : Allows you to change the skin color of the website into High Contrast, or
return to the default skin with Normal Contrast.
: Allows you to change the skin color of the website into High Contrast, or
return to the default skin with Normal Contrast.
Search
 : Allows you to search for accessible content in the website.
Breadcrumb
 : Allows you to ease and keep a consistent navigation. With the breadcrumb, you can easily navigate in an
accessible website.
: Allows you to ease and keep a consistent navigation. With the breadcrumb, you can easily navigate in an
accessible website.
Navigation without JavaScript: One of the successful criteria of a website is to have accessible links and menu before the content when it is displayed like a screen reader. If JavaScript is disabled, you are still able to navigate, and the menu is expanded by default in this case.