Here are step-by-step instructions for setting up Active Directory on Windows and Kerberos Server on Linux.
Active Directory on Windows environment
Note
The above 3 steps require appropriate rights to access the Windows Domain Controller (on Machine 1). If you do not already have these rights, contact with your administrator.
Step 1. Creating a Service Principal Name (SPN) user within the Microsoft Active Directory
According to this article of Microsoft, "an SPN for the server must be registered under either a built-in computer account (such as NetworkService or LocalSystem) or user account". In this step, you create a user account that will be used during the SPN registration in Step 2.
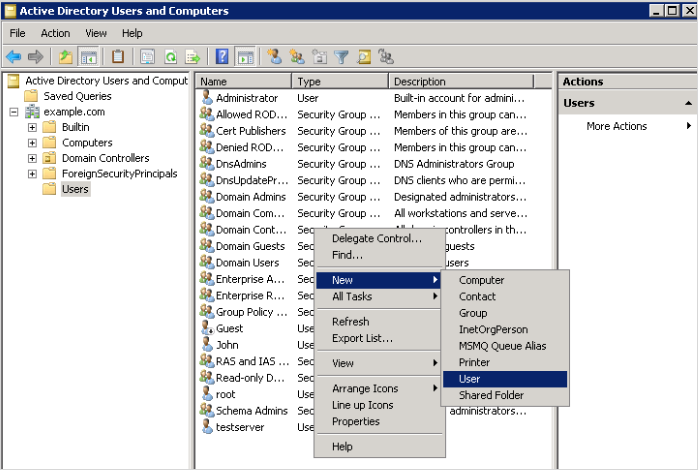
Create a user account within the Active Directory Users and Computers console by clicking → → → → , then right-click in the right panel and select → .
Fill information for the user account, then click Next to move to the Create Password form.
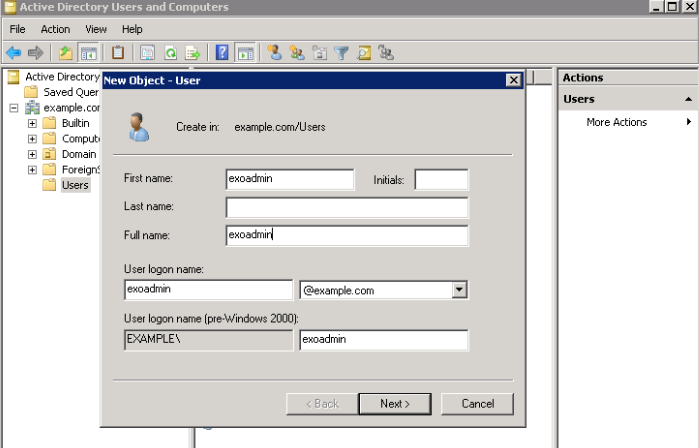
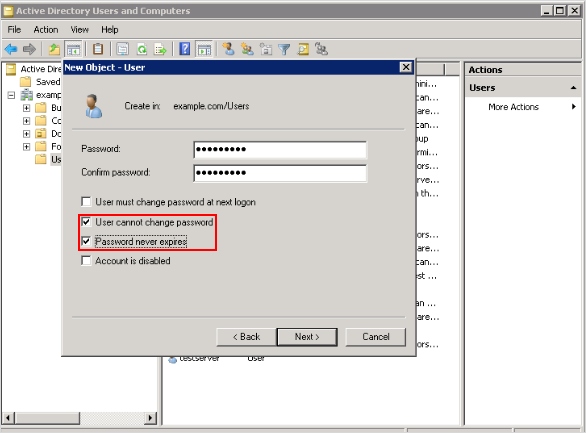
Enter a password for the user account. For example, the username as "exoadmin" with password as "aA@123456" will be used later. Since this account is acting as a service account, select User cannot change password and Password never expires, then click Next. You need to remember this password to use later.
Verify the user settings, and select Finish.
Configure the new user account to comply with the Kerberos protocol as follows:
i. Right-click the user in the Users tree and select Properties. The User Properties form will open.
ii. Navigate to the Account tab. Under the Account options section, ensure the followings are selected: User cannot change password, Password never expires, Do not require Kerberos preauthentication.
Step 2. Configuring the Service Principal Name (SPN) for eXo Platform server
The setspn command is used to create a service principal for the user previously created. A service principal complies with the rule: serviceclass/host.
Because the web application is communicating via the HTTP protocol, HTTP is the service class. The host is fully qualified domain name (FQDN) of the eXo Platform server. The FQDN of the eXo Platform server in this case is server.example.com.
To add a Service Principal, use the commands that comply with the formats:
setspn -a HTTP/$hostname $username (that is, setspn -a HTTP/server exoadmin)
setspn -a HTTP/$fully-qualified-host-name $username (that is, setspn -a HTTP/server.example.com exoadmin)
Tip
Run the following command to see the SPN that you created: setspn -l exoadmin. In which, -l is a lowercase of L.
Step 3. Creating the Kerberos Keytab file used by SPNEGO
In this step, the ktpass is used to generate the keytab file by mapping the service principal to the user account created previously. This file will then be stored in the eXo Platform server (on Machine 2).
Create the keytab file for the eXo Platform server running in an Windows 2008 domain environment that complies with the format: ktpass /princ HTTP/$fully-qualified-domain-name@realm-name /pass "$password" /mapuser "$username" /out $hostname.keytab /ptype KRB5_NT_PRINCIPAL /kvno 0 /crypto RC4-HMAC-NT.
In this scenario, the command will be:
ktpass /princ HTTP/server.example.com@EXAMPLE.COM /pass "aA@123456" /mapuser "EXAMPLE\exoadmin" /out server.keytab /ptype KRB5_NT_PRINCIPAL /kvno 0 /crypto RC4-HMAC-NT
In this step, the
$hostname.keytabfile (that is,server.keytab) will be generated.Copy the generated keytab file to a location on the eXo Platform server.
After creating the keytab file successfully, continue with configuring the eXo Platform server.
Note
The Kerberos setup is dependent on your Linux distribution, so steps can be slightly different in your environment.
Correct the setup of network on the machine. For example, if you are using the "server.example.com" domain as your machine where Kerberos and eXo Platform are located and the machine's IP address is 192.168.1.88, add the following line to the
/etc/hostsfile.192.168.1.88 server.example.com
Note
It is not recommended to use loopback addresses.
Install Kerberos with these packages:
krb5-admin-server,krb5-kdc,krb5-config,krb5-user,krb5-clients, andkrb5-rsh-server. If you are using Ubuntu/Debian, use the following command to install these packages:sudo apt-get install krb5-admin-server krb5-kdc krb5-config krb5-user krb5-clients krb5-rsh-server
Edit the Kerberos configuration file at
/etc/krb5.conf, including:i. Uncomment these lines. If the value of these parameters is "des3-hmac-sha1", change it into rc4-hmac.
default_tgs_enctypes = rc4-hmac
default_tkt_enctypes = rc4-hmac
permitted_enctypes = rc4-hmac
ii. Add
EXAMPLE.COMas a default realm, then addEXAMPLE.COMto the list of realms (and remove the remains of realms - not mandatory). The content looks like:[libdefaults] default_realm = EXAMPLE.COM # The following krb5.conf variables are only for MIT Kerberos. krb4_config = /etc/krb.conf krb4_realms = /etc/krb.realms kdc_timesync = 1 ccache_type = 4 forwardable = true proxiable = true # The following encryption type specification will be used by MIT Kerberos # if uncommented. In general, the defaults in the MIT Kerberos code are # correct and overriding these specifications only serves to disable new # encryption types as they are added, creating interoperability problems. # # The only time when you might need to uncomment these lines and change # the enctypes is if you have local software that will break on ticket # caches containing ticket encryption types it doesn't know about (such as # old versions of Sun Java). default_tgs_enctypes = rc4-hmac default_tkt_enctypes = rc4-hmac permitted_enctypes = rc4-hmac # The following libdefaults parameters are only for Heimdal Kerberos. v4_instance_resolve = false v4_name_convert = { host = { rcmd = host ftp = ftp } plain = { something = something-else } } fcc-mit-ticketflags = true [realms] EXAMPLE.COM = { kdc = server.example.com admin_server = server.example.com } [domain_realm] .example.com = EXAMPLE.COM example.com = EXAMPLE.COM [login] krb4_convert = true krb4_get_tickets = false
Edit the KDC configuration file at
/etc/krb5kdc/kdc.confthat looks like.[kdcdefaults] kdc_ports = 750,88 [realms] EXAMPLE.COM = { database_name = /var/lib/krb5kdc/principal admin_keytab = FILE:/etc/krb5.keytab acl_file = /etc/krb5kdc/kadm5.acl key_stash_file = /etc/krb5kdc/stash kdc_ports = 750,88 max_life = 10h 0m 0s max_renewable_life = 7d 0h 0m 0s master_key_type = rc4-hmac supported_enctypes = rc4-hmac:normal default_principal_flags = +preauth } [logging] kdc = FILE:/tmp/kdc.log admin_server = FILE:/tmp/kadmin.logCreate a KDC database using the sudo krb5_newrealm command.
Note
The
krb5.keytabfile will be created after doing this step. You need to ensure that this file is readable (by using the command: sudo chmod a+r /etc/krb5.keytab if needed).Start the KDC and Kerberos admin servers using these commands:
sudo /etc/init.d/krb5-kdc restart
sudo /etc/init.d/krb5-admin-server restart
Add Principals and create Keys.
i. Start an interactive 'kadmin' session and create the necessary Principals.
sudo kadmin.local
ii. Add the eXo Platform machine and keytab file that need to be authenticated.
addprinc -randkey HTTP/server.example.com@EXAMPLE.COM
ktadd HTTP/server.example.com@EXAMPLE.COM
iii. Add the default eXo Platform user account(s).
addprinc root
You will be asked to enter a password for the user account(s) that you need to remember to use later.
Exit the kadmin.local (for example, by entering the q key), then test your setup by using the command:
kinit -A root
If the setup works well, you are asked to enter the password created for the 'root' user in Step 7. Without -A, the Kerberos ticket validation involves reverse DNS lookups, which may cause trouble to your debug (if your network's DNS setup is not great). Thus, the -A option is recommended in the development setup, but should be avoided in the production environment.
After successful login to Kerberos, you can see your Kerberos ticket when using the klist command.
If you want to log out and destroy your ticket, use the kdestroy command.
After setting up the Kerberos on Linux, move to the next step to configure eXo Platform server.