This section shows you how to write an action in eXo Platform. When all the steps (including deployment step in next section), a "ShowNodePath" button will be displayed in Sites Explorer. A click on the button will show the node path of the current node.
Create a Maven project which has the following directory structure:
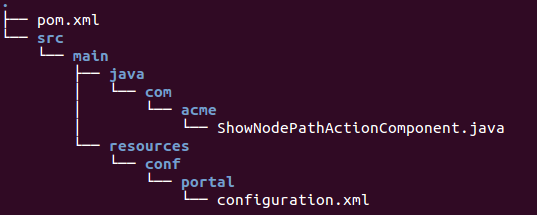
pom.xml: The project's POM file.ShowNodePathActionComponent.java: The simple action to view the node path.configuration.xml: The configuration file to register your action with the org.exoplatform.webui.ext.UIExtensionManager service.
Here is content of the
pom.xmlfile:<?xml version="1.0" encoding="UTF-8"?>
<project xmlns="http://maven.apache.org/POM/4.0.0" xmlns:xsi="http://www.w3.org/2001/XMLSchema-instance"
xsi:schemaLocation="http://maven.apache.org/POM/4.0.0 http://maven.apache.org/maven-v4_0_0.xsd">
<modelVersion>4.0.0</modelVersion>
<groupId>com.acme</groupId>
<artifactId>action-example</artifactId>
<version>1.0</version>
<packaging>jar</packaging>
<properties>
<project.build.sourceEncoding>UTF-8</project.build.sourceEncoding>
</properties>
<dependencies>
<dependency>
<groupId>org.gatein.portal</groupId>
<artifactId>exo.portal.webui.core</artifactId>
<version>3.5.2.Final</version>
<scope>provided</scope>
</dependency>
<dependency>
<groupId>org.exoplatform.commons</groupId>
<artifactId>commons-webui-ext</artifactId>
<version>4.0.0</version>
<scope>provided</scope>
</dependency>
<dependency>
<groupId>org.exoplatform.ecms</groupId>
<artifactId>ecms-core-webui-explorer</artifactId>
<version>4.0.0</version>
</dependency>
</dependencies>
</project>
Create a new action and its corresponding listener by editing the
ShowNodePathActionComponentclass as below:package com.acme;
import javax.jcr.Node;
import org.exoplatform.ecm.webui.component.explorer.UIJCRExplorer;
import org.exoplatform.ecm.webui.component.explorer.control.listener.UIActionBarActionListener;
import org.exoplatform.web.application.ApplicationMessage;
import org.exoplatform.webui.config.annotation.ComponentConfig;
import org.exoplatform.webui.config.annotation.EventConfig;
import org.exoplatform.webui.core.UIComponent;
import org.exoplatform.webui.event.Event;
@ComponentConfig(
events = { @EventConfig(listeners = ShowNodePathActionComponent.ShowNodePathActionListener.class) })
public class ShowNodePathActionComponent extends UIComponent {
public static class ShowNodePathActionListener extends UIActionBarActionListener<ShowNodePathActionComponent> {
@Override
protected void processEvent(Event<ShowNodePathActionComponent> event) throws Exception {
UIJCRExplorer uiJCRExplorer = event.getSource().getAncestorOfType(UIJCRExplorer.class);
Node node = uiJCRExplorer.getCurrentNode();
event.getRequestContext()
.getUIApplication()
.addMessage(new ApplicationMessage("Node path:" + node.getPath(), null, ApplicationMessage.INFO));
}
}
}Register the new action with UIExtensionManager in the
configuration.xmlfile as below:<configuration xmlns="http://www.exoplatform.org/xml/ns/kernel_1_2.xsd" xmlns:xsi="http://www.w3.org/2001/XMLSchema-instance" xsi:schemaLocation="http://www.exoplatform.org/xml/ns/kernel_1_2.xsd http://www.exoplatform.org/xml/ns/kernel_1_2.xsd">
<external-component-plugins>
<target-component>org.exoplatform.webui.ext.UIExtensionManager</target-component>
<component-plugin>
<name>add.action</name>
<set-method>registerUIExtensionPlugin</set-method>
<type>org.exoplatform.webui.ext.UIExtensionPlugin</type>
<init-params>
<object-param>
<name>ShowNodePath</name>
<object type="org.exoplatform.webui.ext.UIExtension">
<field name="type">
<string>org.exoplatform.ecm.dms.UIActionBar</string>
</field>
<field name="name">
<string>ShowNodePath</string>
</field>
<field name="component">
<string>com.acme.ShowNodePathActionComponent</string>
</field>
</object>
</object-param>
</init-params>
</component-plugin>
</external-component-plugins>
</configuration>
Some remarks about the Java code and the configuration:
ShowNodePathwill be used to label the action, until you configure the label in resource bundle that will be explained later.ShowNodePathActionComponentis the class name of your action.There is a matching rule between the action name (
ShowNodePath) and the listener class name (ShowNodePathActionListener): the listener class name = the action name + ActionListener.
Build your project: mvn clean install
Copy the
.jarfile (target/action-example-1.0.jar) to thelibfolder of eXo Platform.Restart the server.
Testing
Log in as an administrator and go to Content Administration.
Edit a view to add the action to one of tabs of the view. At this step, you will see the
ShowNodePathaction as below: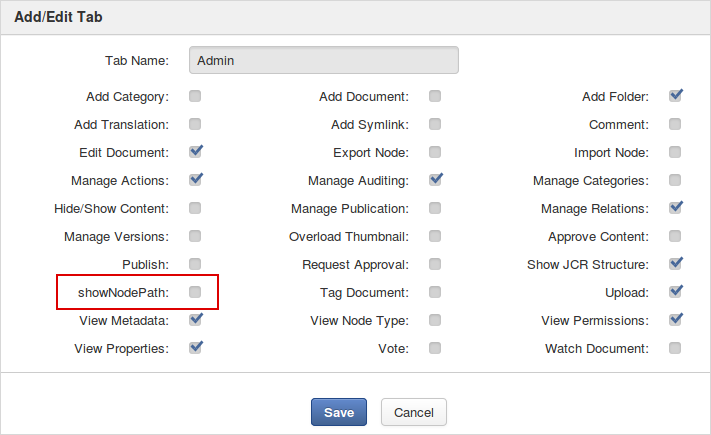
Make sure there is a drive that applies the view. For example, you can choose the Admin view and the Collaboration drive.
Go to Sites Explorer and select the drive, then switch to the edited view.
Select any node. The "ShowNodePath" button now displays in Action bar as below:

Next, you can perform the followings for your action extension:
Customizing labels
As you can see in the screenshots in previous section, your action displays in UI as "showNodePath" or "ShowNodePath".
You can change this label to something in more friendly way, like "Show Node Path",
by adding and registering your resource bundle to ResourceBundle service:
Add the
src/main/resources/locale/com/acmefolder to your project.Add the
ShowNodePath_en.xmlfile to this folder, with the following content:<bundle>
<UITabForm>
<label>
<showNodePath>Show Node Path</showNodePath>
</label>
</UITabForm>
<UIActionBar>
<tooltip>
<ShowNodePath>Show Node Path</ShowNodePath>
</tooltip>
</UIActionBar>
</bundle>
Note
Notice the "showNodePath" tag (lowercase for first letter) in UITabForm. What you configure in UITabForm element will be displayed in Content Administration portlet. The other, UIActionBar, is for Sites Explorer portlet.
Add the following configuration to
src/main/resources/conf/portal/configuration.xml:<external-component-plugins>
<target-component>org.exoplatform.services.resources.ResourceBundleService</target-component>
<component-plugin>
<name>UI Extension</name>
<set-method>addResourceBundle</set-method>
<type>org.exoplatform.services.resources.impl.BaseResourceBundlePlugin</type>
<init-params>
<values-param>
<name>init.resources</name>
<value>locale.com.acme.ShowNodePath</value>
</values-param>
<values-param>
<name>portal.resource.names</name>
<value>locale.com.acme.ShowNodePath</value>
</values-param>
</init-params>
</component-plugin>
</external-component-plugins>
The
locale.com.acme.ShowNodePathvalue expresses that your resource files should be located in thelocale/com/acme/folder and have the "ShowNodePath" prefix in name.ShowNodePath_en.xmlis resource for English of which "en" is the locale code. You can add other resources for many languagues.
Now re-build your project and deploy. Restart server and test, you will see the labels change into "Show Node Path".
See more details about ResourceBundle service and locale codes.
If you want more samples of such configuration, see:
webapps/ecmexplorer.war!/WEB-INF/classes/locale/portlet/explorer/JCRExplorerPortlet_en.xmlwebapps/ecmadmin.war!/WEB-INF/classes/locale/portlet/administration/ECMAdminPortlet_en.xml
Customizing icons
Edit the webapps/ecmexplorer.war!/skin/icons/24x24/DefaultStylesheet.css file (for the default Skin)
and add the icon definition as below (in this case, the "ManageUnLock" icon is re-used
but you could add your own picture into the webapps/ecmexplorer.war!/skin/icons/24x24/DefaultSkin directory):
.ShowNodePathIcon{
width: 24px; height: 24px;
background: url('DefaultSkin/ManageUnLock.gif') no-repeat left center; /* orientation=lt */
background: url('DefaultSkin/ManageUnLock.gif') no-repeat right center; /* orientation=rt */
}Write your filter class (
com/acme/MyUIFilter.java):package com.acme;
import java.util.Map;
import javax.jcr.Node;
import org.exoplatform.webui.ext.filter.UIExtensionFilter;
import org.exoplatform.webui.ext.filter.UIExtensionFilterType;
public class MyUIFilter implements UIExtensionFilter {
/*
* This method checks if the current node is a file.
*/
public boolean accept(Map<String, Object> context) throws Exception {
//Retrieve the current node from the context
Node currentNode = (Node) context.get(Node.class.getName());
return currentNode.isNodeType("nt:file");
}
/*
* This is the type of the filter.
*/
public UIExtensionFilterType getType() {
return UIExtensionFilterType.MANDATORY;
}
/*
* This is called when the filter has failed.
*/
public void onDeny(Map<String, Object> context) throws Exception {
System.out.println("This node is not a file!");
}
}This filter checks if the current node is a file. Because the filter type is MANDATORY, the action will hide if the current node is a folder. (Thus, with MANDATORY you cannot test
onDenymethod. Change the type into OPTIONAL if you want to test the method.)Apply the filter in your action class (
com/acme/ShowNodePathActionComponent.java):...
import java.util.List;
import java.util.Arrays;
import org.exoplatform.webui.ext.filter.UIExtensionFilter;
import org.exoplatform.webui.ext.filter.UIExtensionFilters;
import com.acme.MyUIFilter;
...
public class ShowNodePathActionComponent extends UIComponent {
...
/*
* Add filters (MyUIFilter in this example)
*/
private static final List<UIExtensionFilter> FILTERS = Arrays.asList(new UIExtensionFilter[] {new MyUIFilter()});
@UIExtensionFilters
public List<UIExtensionFilter> getFilters() {
return FILTERS;
}
}
Now build, deploy and test that your action displays only for nodes of type "nt:file".
You have added a filter by Java code. Another way is by configuration, that is extremely good when the filter itself allows flexible configuration. For example, you continue to add UserACLFilter (built-in) that allows you to configure who can use the action:
Add the following configuration to
conf/portal/configuration.xml:<external-component-plugins>
<target-component>org.exoplatform.webui.ext.UIExtensionManager</target-component>
...
<field name="extendedFilters">
<collection type="java.util.ArrayList">
<value>
<object type="org.exoplatform.webui.ext.filter.impl.UserACLFilter">
<field name="permissions">
<collection type="java.util.ArrayList">
<value>
<string>manager:/platform/administrators</string>
</value>
</collection>
</field>
</object>
</value>
</collection>
</field>
...
</external-component-plugins>
Then test that the action displays only for the users who have manager:/platform/administrators membership.
There are many useful built-in filters in Content. In your real project, you should see if some of them meet your business logic before writing a new one:
org.exoplatform.webui.ext.filter.impl.UserACLFilter: Filters all nodes that do not have any permission on the current context.org.exoplatform.webui.ext.filter.impl.FileFilter: Filters all nodes that do not exist in the given MIME type list.org.exoplatform.ecm.webui.component.explorer.control.filter: This package includes many filters, see in the table.
| Filters | Description |
|---|---|
CanAddCategoryFilter | Filters nodes to which it is impossible to add categories. |
CanCutNodeFilter | Filters nodes which cannot be cut. |
CanAddNodeFilter | Filters nodes to which it is impossible to add nodes. |
CanDeleteNodeFilter | Filters nodes that cannot be deleted. |
CanRemoveNodeFilter | Filters nodes that cannot be removed. |
CanEnableVersionFilter | Filters nodes which do not allow versioning. |
CanSetPropertyFilter | Filters nodes that cannot be modified. |
HasMetadataTemplatesFilter | Filters nodes that do not have metadata templates. |
HasPublicationLifecycleFilter | Filters all nodes that do not have the publication plugins. |
HasRemovePermissionFilter | Filters nodes that do not have the Removepermission. |
IsFavouriteFilter | Filters nodes that are not favorite. |
IsNotFavouriteFilter | Filters nodes that are favorite. |
IsNotNtFileFilter | Filters nodes that are of nt:file. |
IsHoldsLockFilter | Filters nodes which do not hold lock. |
IsNotHoldsLockFilter | Filters nodes which are holding lock. |
IsNotRootNodeFilter | Filters the root node. |
IsInTrashFilter | Filters nodes that are not in the trash node. |
IsNotInTrashFilter | Filters nodes that are in the trash node. |
IsNotSameNameSiblingFilter | Filters nodes that allow the same name siblings. |
IsMixCommentable | Filters nodes that do not allow commenting. |
IsMixVotable | Filters nodes that do not allow voting. |
IsNotSimpleLockedFilter | Filters nodes that are locked. |
IsNotSymlinkFilter | Filters nodes that are symlinks. |
IsNotCategoryFilter | Filters nodes that are of the category type. |
IsNotSystemWorkspaceFilter | Filters actions of the system-typed workspace. |
IsNotCheckedOutFilter | Filters nodes that are checked out. |
IsTrashHomeNodeFilter | Filters nodes that are not trash ones. |
IsNotTrashHomeNodeFilter | Filters a node that is the trash one. |
IsNotEditingDocumentFilter | Filters nodes that are being edited. |
IsPasteableFilter | Filters nodes where the paste action is not allowed. |
IsReferenceableNodeFilter | Filters nodes that do not allow adding references. |
IsNotFolderFilter | Filters nodes that are folders. |
IsCheckedOutFilter | Filters nodes that are not checked out. |
IsVersionableFilter | Filters nodes which do not allow versioning. |
IsVersionableOrAncestorFilter | Filters nodes and ancestor nodes which do not allow versioning. |
IsDocumentFilter | Filters nodes that are not documents. |
IsEditableFilter | Filters nodes that are not editable. |