CKEditor comes with a rich set of configuration options that make it possible to customize its appearance,
features, and behavior. The main configuration file is named config.js. This
file can be found in the root of the CKEditor installation folder (/webapps/CommonsResources/ckeditor/config.js). By default, this file is mostly empty. To change the
CKEditor configuration, add the settings that you want to modify to the config.js file.
For example:
CKEDITOR.editorConfig = function( config )

{

    config.language = 'en';

    config.uiColor = '#AADC6E';

};
Instead of using the default config.js
file, you can create a copy of that file anywhere in your website and simply point the editor instances to load
it. For example, in eXo Platform, the configuration file for CKEditor is placed at /webapps/CommonsResources/eXoConfig.js, so the content of the
config.js file will be:
CKEDITOR.editorConfig = function( config )

{

    config.customConfig = "../eXoConfig.js";

};
You can change the CKEditor skin by adjusting a single configuration option. In eXo Platform, to change the CKEditor skin, do as follows:
Open the
/webapps/CommonsResources/eXoConfig.jsconfiguration file of CKEditor.Set up a skin for CKEditor. It may be the name of the skin folder inside the editor installation path, or the name and the path separated by a comma.
config.skin = 'v2';
    config.skin = 'myskin,/customstuff/myskin/';
By default, CKEditor has 2 skins for users to select: kama, and moono. They are placed in the
/webapps/CommonsResources/ckeditor/skinsfolder.
CKEditor is a full-featured WYSIWYG editor, but not all of its options are needed in all cases. Therefore, the toolbar customization is one of the most common and required tasks when dealing with CKEditor.
Toolbar Definition is a JavaScript array which contains the elements to be displayed in all toolbar rows available in the editor. In eXo Platform, the toolbar definition is placed in the
/webapps/CommonsResources/eXoConfig.jsfile. The following code snippet contains the default CKEditor toolbar set in eXo Platform.
config.toolbar_Default = [

     ['Source','Templates'],

     ['Cut','Copy','PasteText','-','SpellCheck'],

     ['Undo','Redo','-','RemoveFormat'],

    '/',

     ['Bold','Italic','Underline','Strike'],

     ['NumberedList','BulletedList'],

     ['Link','Unlink','Anchor'],

     ['Image','Flash','Table','SpecialChar'],

     ['TextColor','BGColor'],

     ['Maximize', 'ShowBlocks'],

     ['Style','Format','Font','FontSize']

] ;
config.toolbar_MyToolbar =

[

 ['Bold', 'Italic', '-', 'NumberedList', 'BulletedList', '-', 'Link', 'Unlink','-','About']

];
To show the newly added toolbar, you have to add it to a field of a template. For example, to show the new toolbar on the content field of HTML file, you need to modify the dialog template of HTML file as follows:
String[] fieldSummary = ["jcrPath=/node/jcr:content/jcr:data", "", "options=toolbar:MyToolbar, noSanitization"] ;

        uicomponent.addRichtextField("contentHtml", fieldSummary) ;
By adding a new HTML file, you will see the new toolbar (MyToolbar) on the content field:
Creating a basic plugin for CKEditor
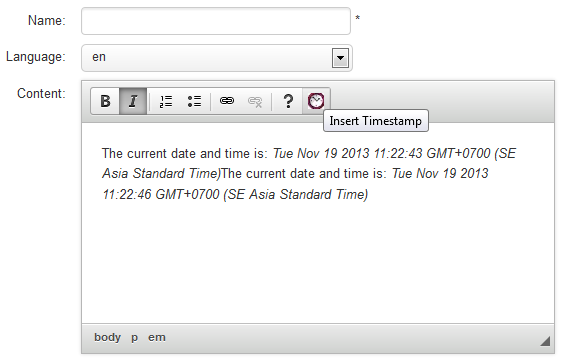
Assuming that you will develop a timestamp plugin that inserts the current date and time into the editing area of CKEditor. The timestamp will be added after a user clicks a dedicated toolbar button. The implementation makes use of the insertHtml function which can be also easily adjusted to insert any other HTML elements into CKEditor.
Create a directory inside the
pluginsoreXoPluginsdirectory for CKEditor with the timestamp plugin.Place the
plugin.jsfile that contains the plugin logic inside the newly createdtimestampfolder. Also, you will need a toolbar icon for the plugin by adding animagesfolder and subsequently placing thetimestamp.pngfile inside it.Modify the
plugin.jsfile in which you will write the behavior.The following is the code used to create a simple plugin named timestamp:
CKEDITOR.plugins.add( 'timestamp',

{

 init: function( editor )

 {

  editor.addCommand( 'insertTimestamp',

   {

    exec : function( editor )

    {

     var timestamp = new Date();

     editor.insertHtml( 'The current date and time is: <em>' + timestamp.toString() + '</em>' );

    }

   });

  editor.ui.addButton( 'Timestamp',

  {

   label: 'Insert Timestamp',

   command: 'insertTimestamp',

   icon: this.path + 'images/timestamp.png'

  } );

 }

} );
To use the created plugin, plug it to CKEditor by adding the following codes to webapps/CommonsResources/eXoConfig.js:
(function() {CKEDITOR.plugins.addExternal('timestamp',CKEDITOR.eXoPath+'ckeditor/plugins/timestamp/','plugin.js');})();

    ....

    config.extraPlugins = 'content,insertGadget,insertPortalLink,scayt,wsc,acceptInline,cancelInline,onchange,helpBBCode,syntaxhighlight,timestamp';

    ....

    config.toolbar_MyToolbar =

        [


         ['Bold', 'Italic', '-', 'NumberedList', 'BulletedList', '-', 'Link', 'Unlink','-','About','Timestamp']


        ];
The following is the illustration about the Timestamp plugin added to the CKEditor.