eXo Platform comes with a bunch of content forms (Web Content, Illustrated Web Content, File and more). For some reasons, you may want to create your own content form. To do that, follow either of the following ways:
Directly inline, via the Content Administration interface. See Node Types and Document templates for more details.
In your extension, via XML configuration files as described in this section.
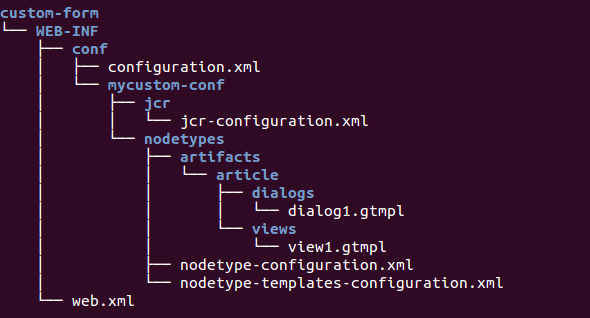
This tutorial instructs you to create your own content form named "Article" by using a custom extension. This custom extension requires a jar and a war, so make sure you are aware of creating and deploying these files into eXo Platform.
Below are steps for the war. In this context, the webapp name is custom-form that needs to be configured properly in the jar.
Step 1. Creating a new content type named "exo:article"
Edit
custom-form.war!/WEB-INF/conf/mycustom-conf/nodetypes/nodetype-configuration.xml. This file contains the full definition of the content type, for example:<nodeTypes xmlns:nt="http://www.jcp.org/jcr/nt/1.0" xmlns:mix="http://www.jcp.org/jcr/mix/1.0"
xmlns:jcr="http://www.jcp.org/jcr/1.0">
<nodeType name="exo:article" isMixin="false" hasOrderableChildNodes="false" primaryItemName="">
<supertypes>
<supertype>nt:base</supertype>
<supertype>mix:referenceable</supertype>
<supertype>exo:rss-enable</supertype>
</supertypes>
<propertyDefinitions>
<propertyDefinition name="exo:text" requiredType="String" autoCreated="false" mandatory="false"
onParentVersion="COPY"
protected="false" multiple="false">
<valueConstraints/>
</propertyDefinition>
</propertyDefinitions>
<childNodeDefinitions>
<childNodeDefinition name="*" defaultPrimaryType="nt:file" autoCreated="false" mandatory="false"
onParentVersion="COPY" protected="false" sameNameSiblings="true">
<requiredPrimaryTypes>
<requiredPrimaryType>nt:file</requiredPrimaryType>
</requiredPrimaryTypes>
</childNodeDefinition>
</childNodeDefinitions>
</nodeType>
</nodeTypes>
By defining a supertype, you can reuse other content types and extend them with more properties (just like inheritance in Object Oriented Programming).
Register the content type into
custom-form.war!/WEB-INF/conf/mycustom-conf/jcr/jcr-configuration.xml.<?xml version="1.0" encoding="ISO-8859-1"?>
<configuration
xmlns:xsi="http://www.w3.org/2001/XMLSchema-instance"
xsi:schemaLocation="http://www.exoplatform.org/xml/ns/kernel_1_2.xsd http://www.exoplatform.org/xml/ns/kernel_1_2.xsd"
xmlns="http://www.exoplatform.org/xml/ns/kernel_1_2.xsd">
<external-component-plugins>
<target-component>org.exoplatform.services.jcr.RepositoryService</target-component>
<component-plugin>
<name>add.nodeType</name>
<set-method>addPlugin</set-method>
<type>org.exoplatform.services.jcr.impl.AddNodeTypePlugin</type>
<init-params>
<values-param>
<name>autoCreatedInNewRepository</name>
<description>Node types configuration file</description>
<value>war:/conf/mycustom-conf/nodetypes/nodetype-configuration.xml</value>
</values-param>
</init-params>
</component-plugin>
</external-component-plugins>
</configuration>
Import
jcr-configuration.xmlinsidecustom-form.war!/WEB-INF/conf/configuration.xml.<?xml version="1.0" encoding="ISO-8859-1"?>
<configuration
xmlns:xsi="http://www.w3.org/2001/XMLSchema-instance"
xsi:schemaLocation="http://www.exoplatform.org/xml/ns/kernel_1_2.xsd http://www.exoplatform.org/xml/ns/kernel_1_2.xsd"
xmlns="http://www.exoplatform.org/xml/ns/kernel_1_2.xsd">
<import>war:/conf/mycustom-conf/jcr/jcr-configuration.xml</import>
</configuration>
To view this content type through UI, you also need to create templates linked to it, as described in Step 2. Creating a content template for the content type.
Step 2. Creating a content template for the content type
There are three of templates applied to a content type:
Dialog is in the HTML form that allows creating node instances.
View is in the HTML fragments which are used to display nodes.
CSS can be embedded into the Views template to define how to display HTML elements.
This tutorial only instructs how to create Dialog and View templates that are mandatory.
If you want to add CSS for your content type, create Stylesheet.css under custom-form.war!/WEB-INF/conf/mycustom-conf/nodetypes/artifacts/article/css.
You can use CSS templates to embed into the View template.
See the CSS section for how to create a CSS template.
Edit the Dialog template for the exo:article content type under
custom-form.war!/WEB-INF/conf/mycustom-conf/nodetypes/artifacts/article/dialogs/dialog1.gtmpl. This step is mandatory.<div class="UIForm FormLayout FormScrollLayout">
<%
uiform.begin()
%>
<%/* start render action*/%>
<% if (uiform.isShowActionsOnTop()) {
uiform.processRenderAction()
}
%>
<%/* end render action*/%>
<div class="HorizontalLayout">
<table class="UIFormGrid">
<tr>
<td class="FieldLabel">
<label for="title">Title</label>
</td>
<td class="FieldComponent">
<%
String[] fieldTitle = ["jcrPath=/node/exo:title", "options=noSanitization", "validate=empty"] ;
uicomponent.addTextField("title", fieldTitle) ;
%>
</td>
</tr>
<tr>
<td class="FieldLabel">
<label for="name">Name</label>
</td>
<td class="FieldComponent">
<%
String[] fieldName = ["jcrPath=/node", "options=noSanitization",
"mixintype=mix:votable,mix:commentable,mix:i18n,mix:versionable", "editable=if-null",
"validate=empty,name"] ;
uicomponent.addTextField("name", fieldName) ;
%>
<script type="text/javascript">
titleField = document.getElementById("title");
titleField.onchange = function() { eXo.ecm.SELocalization.cleanName(this.value, "name"); } ;
</script>
</td>
</tr>
<tr>
<td class="FieldLabel">
<label for="content-lang">Language</label>
</td>
<td class="FieldComponent">
<%
String lang = org.exoplatform.portal.webui.util.Util.getPortalRequestContext().getLocale().toString();
String[] fieldLang = ["jcrPath=/node/exo:language",
"script=ecm-explorer/widget/FillSelectBoxWithLanguage.groovy", lang] ;
uicomponent.addSelectBoxField("content-lang", fieldLang) ;
%>
</td>
</tr>
<tr>
<td class="FieldLabel">
<label for="summary">Summary</label>
</td>
<td class="FieldComponent">
<div class="UIFCKEditor">
<%
String[] fieldSummary = ["jcrPath=/node/exo:summary", "options=Basic", ""] ;
uicomponent.addRichtextField("summary", fieldSummary) ;
%>
</div>
</td>
</tr>
<tr>
<td class="FieldLabel">
<label for="content">Content</label>
</td>
<td class="FieldComponent">
<div class="UIFCKEditor">
<%
String[] fieldContent = ["jcrPath=/node/exo:text",
"options=toolbar:CompleteWCM,'height:410px',noSanitization", ""] ;
uicomponent.addRichtextField("content", fieldContent) ;
%>
</div>
</td>
</tr>
</table>
</div>
<% if (!uiform.isShowActionsOnTop()) {
uiform.processRenderAction()
}
%>
<%uiform.end()%>
</div>
To create a Dialog template, you first need to understand the dialog syntaxes. See here for its basic syntaxes.
Edit the View template for the exo:article content type under
custom-form.war!/WEB-INF/conf/mycustom-conf/nodetypes/artifacts/article/views/view1.gtmpl. This step is mandatory.<%
import org.exoplatform.ecm.webui.utils.Utils ;
%>
<style>
<% _ctx.include(uicomponent.getTemplateSkin("exo:article", "Stylesheet")); %>
</style>
<div id="$uicomponent.id">
<%
def node = uicomponent.getNode() ;
%>
<p>Title: <%=Utils.getTitle(node)%></p>
<p>Summary: <%=node.getProperty("exo:summary").getString()%></p>
<p>Content: <%=node.getProperty("exo:text").getString()%></p>
<%
try{
_ctx.include(uicomponent.getViewTemplate("mix:votable", "view1"));
}catch (Exception e) {}
try{
_ctx.include(uicomponent.getViewTemplate("exo:comments", "view1"));
} catch (Exception e) {}
%>
</div>
See the View section for details. Also, you can see the full configuration of the
view1.gtmplhere.Register the created templates (and CSS if any) with TemplateService under
custom-form.war!/WEB-INF/conf/mycustom-conf/nodetypes/nodetype-templates-configuration.xml, then declare template files into the system via the template plugin.<?xml version="1.0" encoding="ISO-8859-1"?>
<configuration
xmlns:xsi="http://www.w3.org/2001/XMLSchema-instance"
xsi:schemaLocation="http://www.exoplatform.org/xml/ns/kernel_1_2.xsd http://www.exoplatform.org/xml/ns/kernel_1_2.xsd"
xmlns="http://www.exoplatform.org/xml/ns/kernel_1_2.xsd">
<external-component-plugins>
<target-component>org.exoplatform.services.cms.templates.TemplateService</target-component>
<component-plugin>
<name>addTemplates</name>
<set-method>addTemplates</set-method>
<type>org.exoplatform.services.cms.templates.impl.TemplatePlugin</type>
<init-params>
<value-param>
<name>autoCreateInNewRepository</name>
<value>true</value>
</value-param>
<value-param>
<name>storedLocation</name>
<value>war:/conf/mycustom-conf/nodetypes/artifacts</value>
</value-param>
<object-param>
<name>template.configuration</name>
<description>configuration for the localtion of nodetypes templates to inject in jcr</description>
<object type="org.exoplatform.services.cms.templates.impl.TemplateConfig">
<field name="nodeTypes">
<collection type="java.util.ArrayList">
<value>
<object type="org.exoplatform.services.cms.templates.impl.TemplateConfig$NodeType">
<field name="nodetypeName">
<string>exo:article</string>
</field>
<field name="documentTemplate">
<boolean>true</boolean>
</field>
<field name="label">
<string>Article</string>
</field>
<field name="referencedView">
<collection type="java.util.ArrayList">
<value>
<object type="org.exoplatform.services.cms.templates.impl.TemplateConfig$Template">
<field name="templateFile">
<string>/article/views/view1.gtmpl</string>
</field>
<field name="roles">
<string>*</string>
</field>
</object>
</value>
</collection>
</field>
<field name="referencedDialog">
<collection type="java.util.ArrayList">
<value>
<object type="org.exoplatform.services.cms.templates.impl.TemplateConfig$Template">
<field name="templateFile">
<string>/article/dialogs/dialog1.gtmpl</string>
</field>
<field name="roles">
<string>*:/platform/web-contributors</string>
</field>
</object>
</value>
</collection>
</field>
</object>
</value>
</collection>
</field>
</object>
</object-param>
</init-params>
</component-plugin>
</external-component-plugins>
</configuration>
Note
To further understand the template plugin, you can refer to the Template section.
Import
nodetype-templates-configuration.xmlinsidecustom-extension.war!/WEB-INF/conf/configuration.xml. This file now looks like:<?xml version="1.0" encoding="ISO-8859-1"?>
<configuration
xmlns:xsi="http://www.w3.org/2001/XMLSchema-instance"
xsi:schemaLocation="http://www.exoplatform.org/xml/ns/kernel_1_2.xsd http://www.exoplatform.org/xml/ns/kernel_1_2.xsd"
xmlns="http://www.exoplatform.org/xml/ns/kernel_1_2.xsd">
<import>war:/conf/mycustom-conf/jcr/jcr-configuration.xml</import>
<import>war:/conf/mycustom-conf/nodetypes/nodetype-templates-configuration.xml</import>
</configuration>
After following the above steps, you also need to edit custom-form.war!/WEB-INF/web.xml.
<?xml version="1.0" encoding="UTF-8"?>


<web-app version="3.0" metadata-complete="true"

    xmlns="http://java.sun.com/xml/ns/javaee" xmlns:xsi="http://www.w3.org/2001/XMLSchema-instance"

    xsi:schemaLocation="http://java.sun.com/xml/ns/javaee http://java.sun.com/xml/ns/javaee/web-app_3_0.xsd">


   <display-name>custom-form</display-name>


  <!-- ================================================================== -->

  <!--           LISTENER                                                 -->

  <!-- ================================================================== -->

  <listener>

    <listener-class>org.exoplatform.container.web.PortalContainerConfigOwner</listener-class>

  </listener>


</web-app>
Testing the content form "Article"
Now, deploy your custom extension into eXo Platform by putting custom-form.war in the webapps folder and custom-form-config.jar in the lib folder of eXo Platform.
See here for more details.
Restart the server, and go to → → .
Here, click New Content.
You will see your newly content form "Article" in the list of content forms.

Basic syntaxes of Dialog templates
See the following basic syntaxes which are often used for creating a Dialog template.
uicomponent: An instance of the current object.ctx: The current context which is used to get the request context.jcrPath: The relative path inside the current node. It allows binding a field to the node's properties. For example, bind a field to theexo:textproperty of theexo:articlenode.<% String[] fieldContent = ["jcrPath=/node/exo:text", "options=toolbar:CompleteWCM,'height:410px',noSanitization", ""] ; uicomponent.addRichtextField("content", fieldContent) ; %>>The configuration above also shows how to add the Content field to the Dialog template via the
uicomponent.addRichtextField("content", fieldContent)parameter.options: A list of parameters which are input while the content templates are initialized.
To further understand how to use the Dialog syntax, see the Dialogs section. Now, you can easily create a Dialog template.
Note
By default, JavaScript is disabled for any fields of some content templates to prevent the XSS attacks in eXo Platform. You can specify whether JavaScript is allowed to run on a field of the content template or not by using the "option" parameter as the example below:
String [] htmlArguments = ["jcrPath = / node / default.html / JCR: content / JCR: data",
                "options = toolbar: CompleteWCM, height: '410px ', noSanitization" htmlContent];
Interceptors
By adding interceptors to your template, you will be able to execute a Groovy script just before or just after saving the node. Pre-save interceptors are mostly used to validate input values and their overall meaning while the post-save interceptor can be used to do some manipulations or references for the newly created node, such as binding it to a forum discussion or Wiki space.
To add an interceptor, insert the following fragment anywhere in your template:
<% uicomponent.addInterceptor("ecm-explorer/interceptor/PreNodeSaveInterceptor.groovy", "prev");%>
The first argument is the path of the interceptor class that you have created. All the
interceptors are created in ecm-explorer/interceptor/. The second argument can have
the prev value
which executes the interceptor before saving the content or the
post value which executes the interceptor after having saved
the content.
There are two ways to declare an interceptor Groovy script:
Via the Content Administration portlet. See the Scripts for more details.
Via the XML configuration file by using
ScriptService. See the example below:<external-component-plugins>
<target-component>org.exoplatform.services.cms.scripts.ScriptService</target-component>
<component-plugin>
<name>manage.script.plugin</name>
<set-method>addScriptPlugin</set-method>
<type>org.exoplatform.services.cms.scripts.impl.ScriptPlugin</type>
<description>Nothing</description>
<init-params>
<value-param>
<name>autoCreateInNewRepository</name>
<value>true</value>
</value-param>
<value-param>
<name>predefinedScriptsLocation</name>
<value>war:/conf/dms-extension/dms/artifacts</value>
</value-param>
<object-param>
<name>predefined.scripts</name>
<description>description</description>
<object type="org.exoplatform.services.cms.impl.ResourceConfig">
<field name="resources">
<collection type="java.util.ArrayList">
<!-- ecm-explorer/interceptor -->
<value>
<object type="org.exoplatform.services.cms.impl.ResourceConfig$Resource">
<field name="description">
<string>Pre Node Save Interceptor</string>
</field>
<field name="name">
<string>ecm-explorer/interceptor/PreNodeSaveInterceptor.groovy</string>
</field>
</object>
</value>
<value>
<object type="org.exoplatform.services.cms.impl.ResourceConfig$Resource">
<field name="description">
<string>Post Node Save Interceptor</string>
</field>
<field name="name">
<string>ecm-explorer/interceptor/PostNodeSaveInterceptor.groovy</string>
</field>
</object>
</value>
</collection>
</field>
</object>
</object-param>
</init-params>
</component-plugin>
</external-component-plugins>
The interceptor Groovy scripts must implement the CmsScript interface. Pre-save interceptors obtain input values within the context:
public class PreNodeSaveInterceptor implements CmsScript {


  public PreNodeSaveInterceptor() {

  }


  public void execute(Object context) {

    Map inputValues = (Map) context;

    Set keys = inputValues.keySet();

    for(String key : keys) {

      JcrInputProperty prop = (JcrInputProperty) inputValues.get(key);

      println("   --> "+prop.getJcrPath());

    }

  }


  public void setParams(String[] params) {

  }


}
Whereas the post-save interceptor is passed the path of the saved node in the context:
<% uicomponent.addInterceptor("ecm-explorer/interceptor/PostNodeSaveInterceptor.groovy", "post");%>


public class PostNodeSaveInterceptor implements CmsScript {


  public PostNodeSaveInterceptor() {

  }


  public void execute(Object context) {

    String path = (String) context;


    println("Post node save interceptor, created node: "+path);

  }


  public void setParams(String[] params) {

  }

}
See also