Here is a simple example of creating your skin add-on that contains some basic modifications regarding colors, icons and content background.
Creating your skin add-on
In the platform-ui project (by using the command: git clone https://github.com/exodev/platform-ui.git), do as follows:
Modify the
/platform-ui/pom.xmlfile by changing the values of <groupId>org.exoplatform.platform-ui</groupId> and <platform-ui-skin-final-name>eXoSkin</platform-ui-skin-final-name> to {YOUR-SKIN-ADDON}.Note
Do not change the values in <dependencyManagement>.
Search values as org.exoplatform.platform-ui and eXoSkin in the files below and replace with {YOUR-SKIN-ADDON}:
/platform-ui/platform-ui-skin/src/main/webapp/WEB-INF/web.xml/platform-ui/platform-ui-skin/pom.xml/platform-ui/packaging/pom.xml/platform-ui/config/pom.xml/platform-ui/config/src/main/resources/conf/configuration.xml
Replace all values as Default in
/platform-ui/platform-ui-skin/src/main/webapp/WEB-INF/gatein-resources.xmlwith {YOUR-SKIN-ADDON}. For example, <skin-name>Default</skin-name> now becomes <skin-name>{YOUR-SKIN-ADDON}</skin-name>.Go to platform-ui and run the following commands to set a new version, for example, 1.0.x-SNAPSHOT, for the skin add-on.
mvn versions:set -DnewVersion=1.0.x-SNAPSHOT
mvn versions:commit
Modify variables to your demand in
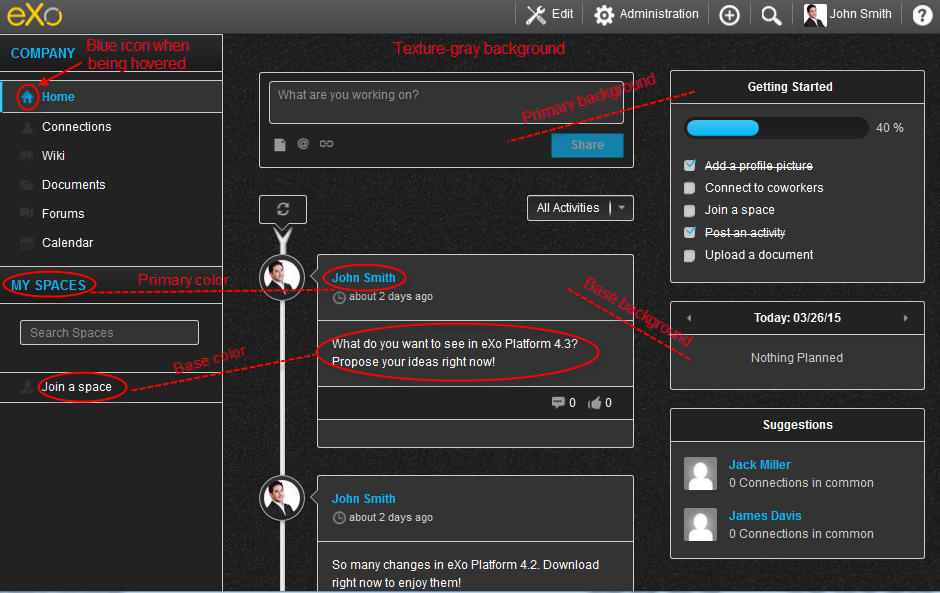
/platform-ui/platform-ui-skin/src/main/webapp/skin/less/variables.less, for example:@baseColor: #ffffff; // text color , border color, and other UI elements..
@baseBackground: #333333; // default background , background for content display....
@primaryColor: #0ab5f5; // primary button and link color...
@primaryBackground: #222222; // main background such as header popup background, tab items...
@images-path: "/{YOUR-SKIN-ADDON}/skin/images/themes/blue";
@contentBackground: url("@{images-path}/ShareImages/Background/texture-gray.jpg") repeat left top;In which:
@baseColor,@baseBackground,@primaryColorand@primaryBackground- The main color variables that define color for majority of component. See here for more details.@images-path- When you install a new theme, the default eXo theme is not removed. So, the default eXo icons can still be reached if you do not modify@images-path. Here, the default value of "/eXoSkin/skin/images/themes/default" is now changed into "/{YOUR-SKIN-ADDON}/skin/images/themes/blue" that means your icons of the "blue" collection will be used. It is recommended you define a new set of icons in a new dedicated folder, then just modify@images-pathas follows:@images-path: "/{YOUR-SKIN-ADDON}/skin/images/themes/{YOUR_ICONS_FOLDER}";
Also, you should open
/platform-ui/platform-ui-skin/pom.xmland find <packagingExcludes> that defines icon collections excluded from the {YOUR-SKIN-ADDON} package. To use the "blue" icons collection instead of the "default" one, in<packagingExcludes>skin/images/PSD/,skin/images/themes/blue/,skin/images/themes/green/,skin/images/themes/orange/,skin/images/themes/pink/,skin/images/themes/red/</packagingExcludes>
remove
skin/images/themes/blue/from the list of excluded icon collections and addskin/images/themes/default/to the list:<packagingExcludes>skin/images/PSD/,skin/images/themes/default/,skin/images/themes/green/,skin/images/themes/orange/,skin/images/themes/pink/,skin/images/themes/red/</packagingExcludes>
Note
With the use of "blue" icons collection, icons will turn into blue when being hovered.
@contentBackground- the initial value of @baseBackground url("@{images-path}/ShareImages/Background/texture.png") repeat left top; is now changed into @baseBackground url("@{images-path}/ShareImages/Background/texture-gray.jpg") repeat left top;. Remember to have the new content background image placed exactly, that isplatform-ui/platform-ui-skin/src/main/webapp/skin/images/themes/blue/ShareImages/Backgroundin this context.
Build platform-ui with the command: mvn clean install.
Go to
/platform-ui/packaging/target/to check if{YOUR-SKIN-ADDON}.zipis generated.
Deploying locally and testing your created skin add-on
Create a
local.jsonin$PLATFORM_HOME/addons/with the below content:[
{
"id": "{YOUR-SKIN-ADDON-ID}",
"version": "1.0.x-SNAPSHOT",
"name": "{YOUR-SKIN-ADDON-NAME}",
"description": "Your Skin Add-on",
"downloadUrl": "file://D:/java/exo-working/platform-ui/packaging/target/{YOUR-SKIN-ADDON}.zip",
"vendor": "eXo platform",
"license": "LGPLv3",
"supportedDistributions": ["community","enterprise"],
"supportedApplicationServers": ["tomcat","jboss"]}
]
In which, the downloadUrl value is where the
{YOUR-SKIN-ADDON}.zipis stored.Install your add-on with the command: addon install {YOUR-SKIN-ADDON-ID} --snapshots
Apply the new theme to eXo Platform.
i. Start eXo Platform package, and log in with the admin account.
ii. Go to → → , then click Edit Site Configuration next to one site, for example, Intranet site.
iii. In the Skin drop-down list, select the new theme {YOUR-SKIN-ADDON-NAME} and click .
Refresh the page and enjoy the new theme.
The current homepage:

The homepage with your applied skin add-on: