The source code used in this section is available here for downloading.
Create a file named
SocialUserAPIs.xmlunder the/gadgets/SocialAPIsGadgets/folder, then add the following script to this file:<?xml version="1.0" encoding="UTF-8" ?>
<Module>
<ModulePrefs title="Social User Gadget">
</ModulePrefs>
<Content type="html">
<![CDATA[
<!--Including platform css-->
<link href="/eXoSkin/skin/css/Core.css" rel="stylesheet"></link>
<link href="/eXoSkin/skin/css/sub-core.css" rel="stylesheet"></link>
<!--Including JQuery library-->
<script src="jquery-2.1.3.js"></script>
<!--Gadget's main body which will be added by HTML DOM Object later-->
<div id="main-body" style="max-width: 850px" class="uiComposer uiGrayLightBox">
<div class="input-append" style="margin: 20px 30px 20px 30px">
//control button for searching users
<button id="get_users_btn" onclick="getUsers()" class="btn btn-primary">Search for user</button>
<input type="text" id="user_info_txt" placeholder="Enter user information...">
</div>
</div>
<!--js functions-->
<script type="text/javascript">
function getUsers(){
//Search for user
}
</script>]]>
</Content>
</Module>
Deploy this gadget. You will see a toolbar that allows to search for user by an input string. To make it work, implement the
getUsers()function as follows:function getUsers(){ $.ajax({ type: "GET", url: "/rest/v1/social/users?q="+$("#user_info_txt").val(), success: function (data, status, jqXHR) { //print the result printUsersList(data.users); }, error: function (jqXHR, status) { alert("Cannot retrieve data!"); } }); }This function sends a GET request which calls the Social REST API /rest/v1/social/users and passes the input string via the
qparameter. It will return a JSON object containing an array of users that match the input string.Add the following
printUsersList()function to print out the returned result.function printUsersList(users){ //print a list of users in a table //clean screen $('#main-content').remove(); $('#sub-content').remove(); //initialize html content to print out the result var obj_content="<div id=\"main-content\"><table class=\"uiGrid table table-hover table-striped\"><thead><tr><th> </th><th>User name</th><th>First name</th><th>Last name</th><th>Email</th></tr></thead><tbody>"; //loop through the list of users $.each(users, function(key, value) { obj_content+="<tr><td>"+key+"</td><td>"+value.username+"</td><td>"+value.firstname+"</td><td>"+value.lastname+"</td><td>"+value.email+"</td></tr>"; }); //add closing tag obj_content+="</tbody></table></div>"; //add to screen $('#main-body').append(obj_content); }Deploy this gadget and create some users to test. For example, search for "john":
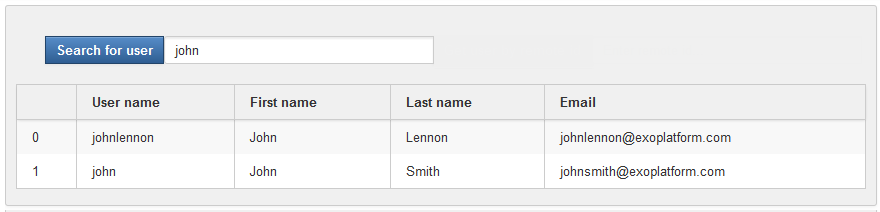
Besides, leaving the input string blank will return all users of the platform.
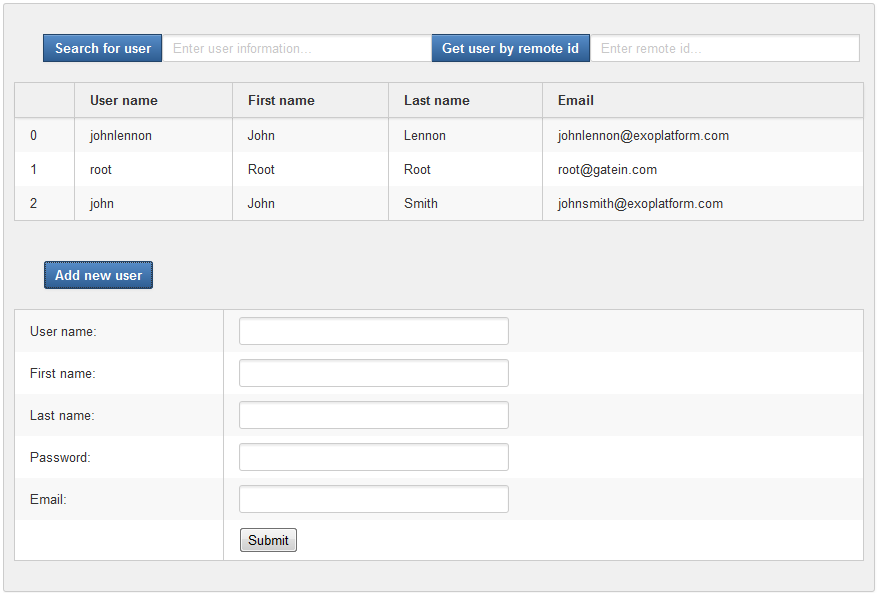
In addition to adding a new user via → → , you can use the Social API /rest/v1/social/users for doing this.
Add a JavaScript function with the following content:
function addNewUserBtn(){
	var obj_content="<button id=\"add_new_user_btn\" onclick=\"addNewUser()\" class=\"btn btn-primary\" style=\"margin: 20px 30px 20px 30px\">Add new user</button>";
	//add to screen
	$('#main-content').append(obj_content);
}
This function is to add the button after printing the search result.
Make a call to this function from the
getUsers()function:... printUsersList(data.users); addNewUserBtn(); ...
Implement the
addNewUser()function as follows:function addNewUser(){ //clean screen $('#sub-content').remove(); //initialize html content var obj_content="<div id=\"sub-content\"><table class=\"uiGrid table table-hover table-striped\"><tr><td>User name: </td><td><input type=\"text\" id=\"username\"></td></tr><tr><td>First name: </td><td><input type=\"text\" id=\"firstname\"></td></tr><tr><td>Last name: </td><td><input type=\"text\" id=\"lastname\"></td></tr><tr><td>Password: </td><td><input type=\"password\" id=\"password\"></td></tr><tr><td>Email: </td><td><input type=\"text\" id=\"email\"></td></tr><tr><td></td><td><button id=\"add_new_user_proc_btn\" onclick=\"addNewUserProcess()\">Submit</button></td></tr></table></div>"; //add to screen $('#main-body').append(obj_content); }This function generates a form to enter data when the button is clicked.
Deploy this gadget. You will see this form when clicking the button.
Call the Social API /rest/v1/social/users and pass the user information as a JSON object to add a new user. Implement the
addNewUserProcess()as below:function addNewUserProcess(){ //check entered data if(($("#username").val().trim()=="")||($("#firstname").val().trim()=="")||($("#lastname").val().trim()=="")||($("#password").val().trim()=="")||($("#email").val().trim()=="")) { alert("Missing information"); return; } //initialize user information as a json object var user_json_obj={ "username":$("#username").val(), "email":$("#email").val(), "firstname":$("#firstname").val(), "lastname":$("#lastname").val(), "password":$("#password").val() }; //send http request $.ajax({ url: "/rest/v1/social/users", contentType: "application/json", data: JSON.stringify(user_json_obj), method: "POST" }).done(function (data, status, xhr) { //reload users list getUsers(); }).fail(function (jqxhr, textStatus, error) { alert("fail"); }); }Deploy this gadget and test the new function.
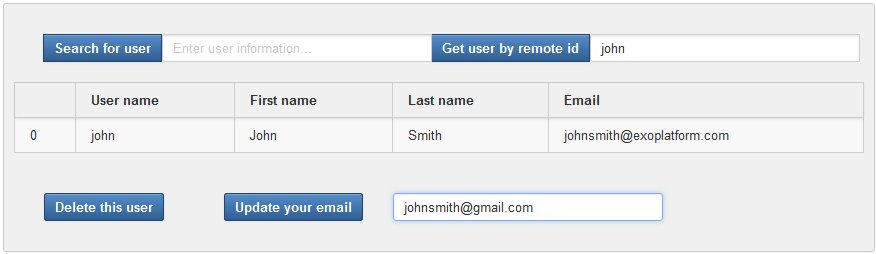
eXo Platform provides the /rest/v1/social/users/{id} API to retrieve information of a specified user. Note that the remote Id here is the user identity which in term of portal is the username.
Add a control button and a text input next to the button.
...
<button id="get_users_btn" onclick="getUsers()" class="btn btn-primary">Search for user</button>
<input type="text" id="user_info_txt" placeholder="Enter user information...">
//control button for getting a specified user
<button id="get_user_by_id_btn" onclick="getUserById()" class="btn btn-primary">Get user by remote id</button>
<input type="text" id="get_user_by_id_txt" placeholder="Enter remote id...">
...
Implement the
getUserById()function as follows:function getUserById(){ //check user id if($("#get_user_by_id_txt").val().trim()==""){ alert("invalid id!"); } //send http request $.ajax({ type: "GET", url: "/rest/v1/social/users/"+$("#get_user_by_id_txt").val().trim(), success: function (data, status, jqXHR) { //print the result var array=new Array(data); printUsersList(array); }, error: function (jqXHR, status) { alert("Cannot retrieve data!"); } }); }Deploy this gadget, then copy any username in the Username column of the users table (after searching for user) to test this function.
To delete a specified user, send a DELETE request to call the /rest/v1/social/users/{id} API.
Declare a global JavaScript variable named
current_user, then add the following command to thegetUserById()function to update this variable whenever a query on a specified user is executed:... //update current user to process current_user=data; //print the result var array=new Array(data); printUsersList(array); addUpdateUserBtn(); ...
Add a control button by implementing the
addUpdateUserBtn()function as below:function addUpdateUserBtn(){ var obj_content="<button id=\"delete_user_btn\" onclick=\"deleteUser()\" class=\"btn btn-primary\" style=\"margin: 20px 30px 20px 30px\">Delete this user</button> //add to screen $('#main-content').append(obj_content); }Implement the
deleteUser()function by this script:function deleteUser(){ //send http request $.ajax({ url: "/rest/v1/social/users/"+current_user.username, method: "DELETE" }).done(function () { //reload users list getUsers(); }).fail(function (jqxhr, textStatus, error) { alert("fail"); }); }In which, the user selected by the button will be deleted.
Deploy this gadget to test the new function.
This section shows you how to update email of a specified user by using the /rest/v1/social/users/{id} API.
Add a control button next to the button by modifying the
addUpdateUserBtn()function as follows:function addUpdateUserBtn(){ var obj_content="<button id=\"delete_user_btn\" onclick=\"deleteUser()\" class=\"btn btn-primary\" style=\"margin: 20px 30px 20px 30px\">Delete this user</button><button id=\"update_user_btn\" onclick=\"updateUser()\" class=\"btn btn-primary\" style=\"margin: 20px 30px 20px 30px\">Update your email</button><input type=\"text\" id=\"update_user_txt\" placeholder=\"Enter your new email...\">"; //add to screen $('#main-content').append(obj_content); }This function generates a form to enter a new email for the selected user.
Implement the
updateUser()function as below:function updateUser(){ //update email of the current user current_user.email=$("#update_user_txt").val(); //send http request $.ajax({ url: "/rest/v1/social/users/"+current_user.username, contentType: "application/json", data: JSON.stringify(current_user), method: "PUT" }).done(function (data, status, xhr) { getUserById(); }).fail(function (jqxhr, textStatus, error) { alert("Failed!"); }); }Note
Only the currently logged-in user can change their email information.
Deploy this gadget, then try to change the email of the currently logged-in user.