Note
This topic is for administrators only who install the Video Calls add-on and configure the SightCall keys.
Install Video Calls with the command: addon install exo-video-calls. The installation procedure of Video Calls is the same to that of another add-ons, as detailed in Installing/Uninstalling add-ons, Administrator Guide.
During installation, you are prompted to accept the license, so remember to hit the Enter key for several times and to type Yes, as instructed on the CLI. You will see a message saying the successful installation.
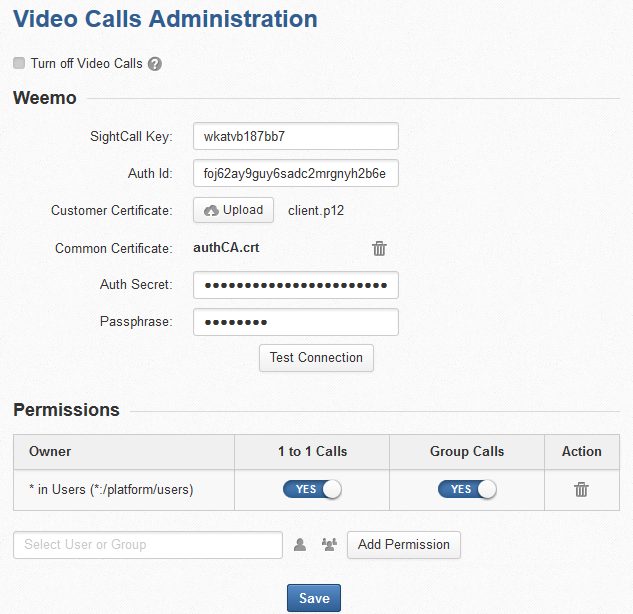
After the successful installation of Video Calls add-on, only administrators (under the *:/platform/administrators group) have rights to configure the global settings by navigating to → on the top administration bar. The Video Calls Administration screen is shown as below:

Turning off Video Calls
By ticking the Turn off Video Calls checkbox, you will completely turn off the Video Calls feature. This means:
The SightCall Plugin Installer pop-up will not appear on any eXo Platform page.
The Call button should not be displayed any longer and nobody will be able to place a video call.
SightCall key configuration
The SightCall section is where administrators should give settings mandatory to communicate with SightCall Service. To do this, first contact to the eXo Sales Team here to get the SightCall keys.
| Fields | Description |
|---|---|
| SightCall Key | The text field for the SightCall Webapp identifier. |
| Auth Id | The text field for the SightCall Auth Client identifier. |
| Auth Secret | The password field for the SightCall Auth Secret identifier. |
| Customer Certificate | The upload field for the Customer Certificate file. |
| Passphrase | The password field for the Customer Certificate Passphrase. |
| Common Certificate | The upload field for the Common Certificate file. |
Click Test Connection to verify if your settings are correct. If your settings are correct, one message "Connected successfully to SightCall service" is shown. Otherwise, an error message "Failed to connect to SightCall service" is shown.
Permissions to start video calls
In the Permissions section, administrators can grant or limit permissions of placing 1 to 1 Calls or Group Calls to any individual users and groups. By default, the permission is granted to all eXo Platform users (under *:/platform/users).
Select the user/group by manually entering into the textbox or by clicking
 /
/ .
.
Click Add Permission to add the selected users or groups to the Permissions table.
Assign the call types (1 to 1 Calls, or Group Calls, or both) by clicking YES or NO buttons.
YES means the selected users/groups have right to place that call type, and NO means the selected ones do not have.
By default, 1 to 1 Calls and Group Calls are auto-granted to the selected users/groups.
Click to make your changes take effect.
Note
Remember that:
If YES is set for one user but NO for the group that he belongs, he still has access to the video calls.
If NO is set for one user but YES for the group that he belongs, he does not have access to the video calls.
If one user belongs to some groups and YES is set for either of the groups (even only one group), he still has access to the video calls.