Warning
You are looking at documentation for an older release. Not what you want? See the current release documentation.
eXo Platform provides APIs to create, update, delete and get information of a calendar.
Getting information of a calendar
Replace content of the
CalendarHTTPRequestGadget.xmlfile with this script:<?xml version="1.0" encoding="UTF-8" ?>
<Module>
<ModulePrefs title="Calendar HTTP Request Gadget">
<Require feature="opensocial-0.8" />
</ModulePrefs>
<Content type="html">
<![CDATA[
<!--Including platform css-->
<link href="/eXoSkin/skin/css/Core.css" rel="stylesheet"></link>
<link href="/eXoSkin/skin/css/sub-core.css" rel="stylesheet"></link>
<!--Including JQuery library-->
<script src="jquery-2.1.3.js"></script>
<!--Gadget's main body which will be added by HTML DOM Object later-->
<div id="calendar-show" style="max-width: 800px" class="uiComposer uiGrayLightBox">
<div class="input-append" style="margin: 20px 30px 20px 30px">
//control button for getting default calendar of the current logged-in user
<button id="get_default_cal_btn" onclick="getDefaultCalendar()" class="btn btn-primary" >Get default calendar</button>
//control button for getting a calendar by id
<button id="get_calid_btn" onclick="getCalendarById()" class="btn btn-primary">Get calendar by id</button><input type="text" id="calid_txt" placeholder="Enter calendar id...">
</div>
</div>
<!--Start calling js function-->
<script type="text/javascript">
//get the current logged-in user via OpenSocial
var current_user;
loadViewer();
function loadViewer() {
var req = opensocial.newDataRequest();
req.add(req.newFetchPersonRequest(opensocial.IdSpec.PersonId.VIEWER), 'viewer');
req.send(onLoadViewer);
}
function onLoadViewer(data) {
var viewer = data.get('viewer').getData();
//get current user
current_user = viewer.getId();
}]]>
</Content>
</Module>
Deploy this gadget. You will see what is going next.

This UI offers 2 functions which are: getting the default calendar or retrieving other calendars by entering a specified Id.
Implement the
getDefaultCalendar()function by adding the following source code to the Javascript paragraph of the gadget:function getDefaultCalendar(){ //get default calendar of the current logged-in user //This function uses AJAX to send GET request to //Calendar REST API GET /rest/private/v1/calendar/calendars/ $.ajax({ type: "GET", url: "/rest/private/v1/calendar/calendars/"+current_user+"-defaultCalendarId", success: function (data, status, jqXHR) { processGetCalendar(data); }, error: function (jqXHR, status) { alert("Cannot retrieve data!"); } }); }The above function uses an Ajax GET request. It calls the REST API /rest/private/v1/calendar/calendars/ and passes *-defaultCalendarId which is the default calendar's Id of the current logged-in user. If successful, the result will then be passed through the
processGetCalendar()function. This function will be implemented later.Consider how to get and pass the entered calendar Id to this REST API instead of hard-coding it by adding the source code:
function getCalendarById(){
					//get the entered calendar id
					var cal_id=$('#calid_txt').val();
					//This function uses AJAX to send GET request to
					//Calendar REST API GET /rest/private/v1/calendar/calendars/
					$.ajax({
						 type: "GET",
						 url: "/rest/private/v1/calendar/calendars/"+cal_id,
						 success: function (data, status, jqXHR) {
							//print the result
							  processGetCalendar(data);
						 },
						 error: function (jqXHR, status) {
							 alert("Cannot retrieve data!");
						 }
					});
				}
This function uses JQuery to get value of the text box for entering calendar Id and pass it to
urlparameter of this call. Now, it's time to process returned results!The data returned from a Calendar GET request is under a JSON object. Therefore, you could implement the
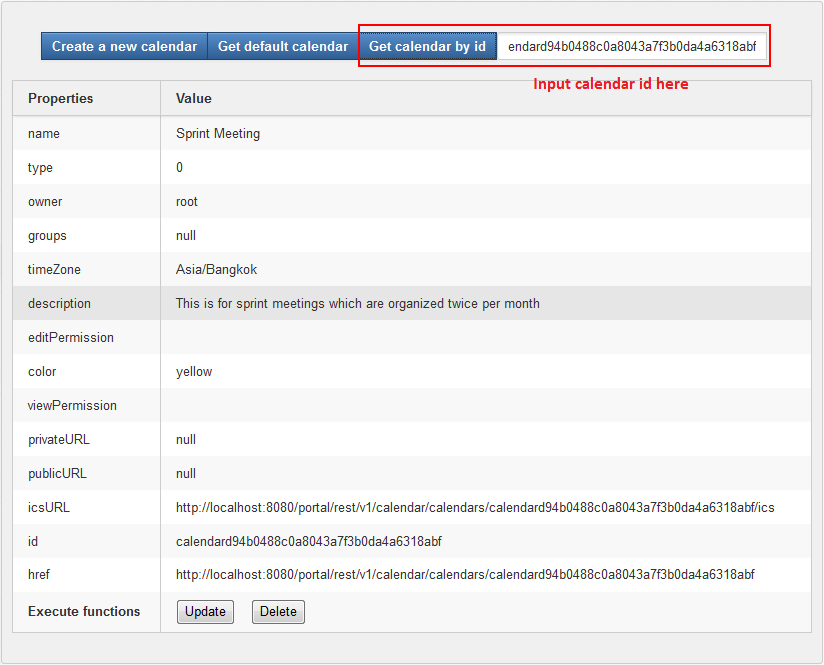
processGetCalendar()as below:function processGetCalendar(results){ //clean the old screen $("#calendar-result").remove(); //add calendar object's information var obj_content="<div id=\"calendar-result\"><table class=\"uiGrid table table-hover table-striped\"><thead><tr><th>Properties</th><th>Value</th></tr></thead><tbody>"; //loop through the calendar object's properties $.each(results, function(key, value) { obj_content+="<tr><td>"+key+"</td><td>"+value+"</td></tr>"; }); //add closing tag obj_content+="<tr><td><b>Execute functions</b></td><td><button id=\"submit_cal_btn\" onclick=\"updateCalendar()\">Update</button> <button id=\"delete_cal_btn\" onclick=\"deleteCalendar()\">Delete</button></td></tr></tbody></table></div>"; //print to screen $('#calendar-show').append(obj_content); }Deploy and test the gadget to see what has been done by clicking . You will see the default calendar's information displayed:

To test the function, move to the next part of creating a new calendar.
Add a control button in front of others like this:
...
	//control button for creating a new calendar
	<button id="create_cal_btn" onclick="createCalendar()" class="btn btn-primary">Create a new calendar</button>
	//control button for getting default calendar of the current logged-in user
	<button id="get_default_cal_btn" onclick="getDefaultCalendar()" class="btn btn-primary" >Get default calendar</button>
	//control button for getting a calendar by id
	<button id="get_calid_btn" onclick="getCalendarById()" class="btn btn-primary">Get calendar by id</button><input type="text" id="calid_txt" placeholder="Enter calendar id...">
	...
Implement the
createCalendar()function as below:function createCalendar(){ //clean the old screen $("#calendar-result").remove(); //add a simple calendar input form $('#calendar-show').append("<div id=\"calendar-result\"><table class=\"uiGrid table table-hover table-striped\">"+ "<thead><tr><th>Properties</th><th>Value</th></tr></thead><tbody>"+ "<tr><td>Name</td><td><input type=\"text\" id=\"cal-name\"></td></tr>" +"<tr><td>Type</td><td><select id=\"cal-type\"><option value=\"0\">Personal calendar</option></select></td></tr>" +"<tr><td>Description</td><td><textarea id=\"cal-description\" rows=\"4\" cols=\"50\"></textarea></td></tr>" +"<tr><td>Color</td><td><select id=\"cal-color\"><option value=\"red\">Red</option><option value=\"yellow\">Yellow</option></select></td></tr>" +"<tr><td><b>Execute functions</b></td><td><button id=\"create_cal_btn\" onclick=\"submitCalendar()\">Submit</button></td></tr>" +"</tbody></table></div>"); }This UI allows to create a simple calendar with properties, such as name, type, description and color.
Create an Ajax POST request to call this API by implementing the
submitCalendar()as follows:function submitCalendar(){ //get entered cal_json_obj var cal_json_obj={ "name":$("#cal-name").val(), "owner": current_user, "type":$("#cal-type").val(), "description":$("#cal-description").val(), "color":$("#cal-color").val() }; $.ajax({ url: "/rest/private/v1/calendar/calendars", contentType: "application/json", data: JSON.stringify(cal_json_obj), method: "POST" }).done(function (data, status, xhr) { //clean the old screen $("#calendar-result").remove(); //get the newly created calendar id var locat=xhr.getResponseHeader('Location'); var new_cal = locat.split("calendar/calendars/"); $('#calendar-show').append("<div id=\"calendar-result\"><i>Created successfully! Calendar id: "+new_cal[1]+"</i></div>"); }).fail(function (jqxhr, textStatus, error) { alert("fail"); }); }This script passes the user input as a JSON object to the POST request. If successful, the returned result will be the newly created calendar Id.
Deploy this gadget to see the input form for creating a new calendar, and fill in this form like:
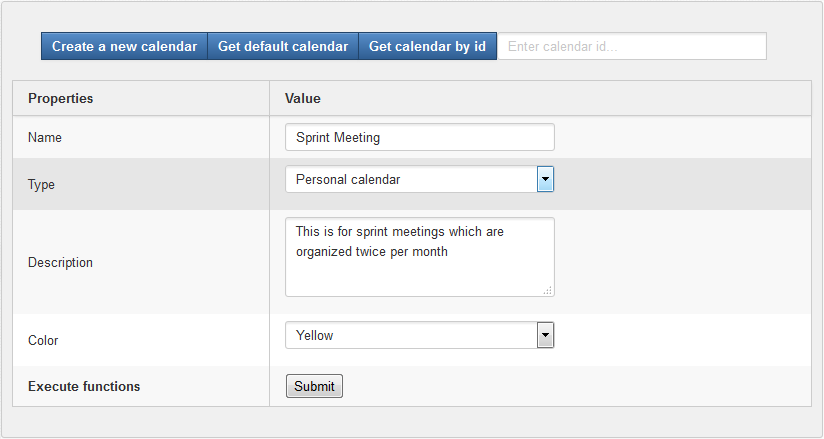
Click Submit button to execute this function and see the message informing that you have successfully created a new calendar. For example: "Created successfully! Calendar id: calendard94b0488c0a8043a7f3b0da4a6318abf".
To check the new calendar, copy the attached Id in this message and paste it to the input text of the function. You will see its information displayed.
It is assumed that you need to update properties of a calendar, for instance its name and description. To avoid passing local variables too many times, you will use a global one called "current_cal_obj" that points to the processing calendar object.
Add a declaration of this variable to the Javascript paragraph of the gadget:
var current_cal_obj;
Now, each time you query a calendar, this variable should be updated by adding the script:
current_cal_obj=results;
to the processGetCalendar() function in getting information of a calendar.
Implement the
updateCalendar()function as follows:function updateCalendar(){ //clean the old result $("#calendar-result").remove(); //add new calendar object's information var obj_content="<div id=\"calendar-result\"><table class=\"uiGrid table table-hover table-striped\"><thead><tr><th>Properties</th><th>Value</th></tr></thead><tbody>"; //loop through the new calendar object's properties $.each(current_cal_obj, function(key, value) { if((key=="name")||(key=="description")){ obj_content+="<tr><td>"+key+"</td><td><textarea id=\"cal-"+key+"\">"+value+"</textarea></td></tr>"; } else { obj_content+="<tr><td>"+key+"</td><td>"+value+"</td></tr>"; } }); //add closing tag obj_content+="<tr><td><b>Execute functions</b></td><td><button id=\"submit_cal_btn\" onclick=\"submitFullCalendar()\">Submit</button> <button id=\"delete_cal_btn\" onclick=\"deleteCalendar()\">Delete</button></td></tr></tbody></table></div>"; //add to screen $('#calendar-show').append(obj_content); }As seen above, you can easily manage the information of the processing calendar object through the global variable.
Deploy the gadget and select a specific calendar, for instance the default one. Then, click the Update button, you will see the name and description fields enabled for editing mode:

If you click the Submit button, nothing happens since you have not implemented the submitFullCalendar() function. To make an update query, you need to send an Ajax PUT request as follows:
function submitFullCalendar(){
					//get changed properties
					current_cal_obj.name=$("#cal-name").val();
					current_cal_obj.description=$("#cal-description").val();
					$.ajax({
						url: "/rest/private/v1/calendar/calendars/"+current_cal_obj.id,
						contentType: "application/json",
						data: JSON.stringify(current_cal_obj),
						method: "PUT"
						}).done(function (data, status, xhr) {
						   $("#calendar-result").remove();
						   $('#calendar-show').append("<div id=\"calendar-result\"><i>Updated successfully!</i></div>");
						}).fail(function (jqxhr, textStatus, error) {
							alert("fail");
					});
				}
Add this function to the Javascript paragraph of the gadget and redeploy it. Now, test your update function and see how it works!
To delete a calendar, you need to make an Ajax DELETE request by implementing the deleteCalendar() function as follows:
function deleteCalendar(){
					$.ajax({
						url: "/rest/private/v1/calendar/calendars/"+current_cal_obj.id,
						method: "DELETE"
						}).done(function () {
						   $("#calendar-result").remove();
						   $('#calendar-show').append("<div id=\"calendar-result\"><i>Deleted successfully!</i></div>");
						}).fail(function (jqxhr, textStatus, error) {
							alert("fail");
					});
				}
This function gets the processing calendar Id from the global variable "current_cal_obj" for passing to the url parameter. And now, deploy this gadget to test this function.