Warning
You are looking at documentation for an older release. Not what you want? See the current release documentation.
If you store users in eXo Platform, you need to configure OpenAM to call back the eXo Platform service to validate a login. In this case (called "callback"), eXo provides the Authentication plugin (org.gatein.sso.opensso.plugin.AuthenticationPlugin - that is similar to CAS) that can be set on the OpenAM server. This plugin makes secure authentication callbacks to a RESTful service installed on the remote eXo Platform server to authenticate a user. Meanwhile, if you store users in another external datasource rather than eXo Platform (called non-callback), you will not need to install the Authentication plugin.
On the OpenAM server side, the followings are required:
$PLATFORM_HOME/openam-plugin.zip!/: This is not needed in case of non-callback.openam.war: You can download the war here. If you download OpenAM as a zip file, extract it and select the exact war inside. The war file name may differ among OpenAM versions (or snapshots). For eXo Platform integration, eXo supports and tests OpenAM 11.0 and OpenAM 10.1. This guide is written on the exact versions: OpenAM 11.0.0 and OpenAM 10.1.0. However, the integration can still work with all versions.Note
Remember that the web context is based on the war file name. For example, if the war file name is
OpenAM-11.0.0.war, the web context is /OpenAM-11.0.0. So, if you do not rename the downloaded war file name intoopenam.war, remember to change the web context accordingly.$OPENAM_TOMCAT_HOME: A Servlet container on which OpenAM server will be deployed. In this tutorial, it is a Tomcat 7 package that you will download and extract to$OPENAM_TOMCAT_HOMEin next steps.
The first procedure is the same for both callback and non-callback cases.
Copy
openam.warinto$OPENAM_TOMCAT_HOME/webappsto deploy OpenAM.Change the default port to avoid a conflict with the default eXo Platform (for testing purposes) by replacing the 8080 port with 8888 in
$OPENAM_TOMCAT_HOME/conf/server.xml.Note
If eXo Platform is running on the same machine as Tomcat, another ports need to be changed to avoid port conflicts. They can be changed to any free port. For example, you can change the admin port from 8005 to 8805, and the AJP port from 8009 to 8809.
Start the OpenAM Tomcat server (
$OPENAM_TOMCAT_HOME\bin\startup.batfor Windows, or$OPENAM_TOMCAT_HOME/bin/startup.shfor Linux/OS X).
After deploying OpenAM, you need to properly configure the OpenAM server. The configuration will be different between callback or non-callback cases. In particular:
If you store users in eXo Platform, see Configuring the OpenAM server for callback case.
If you store users in another external datasource (such as default OpenAM DataStore, or LDAP), see Configuring the OpenAM server for non-callback case.
Configuring the OpenAM server for callback case
Step 1. Setting up the Authentication plugin
Go to
$PLATFORM_HOME, and install OpenAM add-on with the command: addon install exo-openam. If you want to use one specific version of OpenAM add-on, check by yourself with command: addon list --snapshots.After successful installation, one zip folder named
openam-plugin.zipis generated at the root of$PLATFORM_HOME.Extract
$PLATFORM_HOME/openam-plugin.zip, then copy and merge its content into$OPENAM_TOMCAT_HOME/webapps/openam.Check
$OPENAM_TOMCAT_HOME/webapps/openam/WEB-INF/classes/gatein.propertiesto ensure the correct information about your portal is already given as below.host=localhost port=8080 context=portal protocol=http httpMethod=POST
Step 2. Configuring realm in OpenAM UI
Note
The UI of OpenAM forms may be a little different between OpenAM versions. In the procedure below, screenshots are based on OpenAM 11.0.1.
Start OpenAM Tomcat server, then browse http://localhost:8888/openam. You will be redirected to the Configuration Options page like below.
Click the Create Default Configuration link.
Select passwords for Default User (amAdmin) and Default Policy Agent, then click the Create Configuration button. Remember that these 2 passwords must be different.
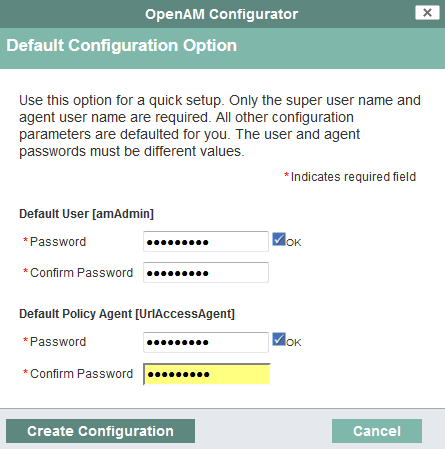
You need to wait for some minutes when the OPENAM configuration is in progress. If the configuration is successful, you will receive a message stating "Configuration Complete!".
Click the Proceed to Login link.
Enter the username (amAdmin) and password created previously in the Sign in to OpenAM form, then click the LOG IN button. You will be redirected to the OpenAM homepage.
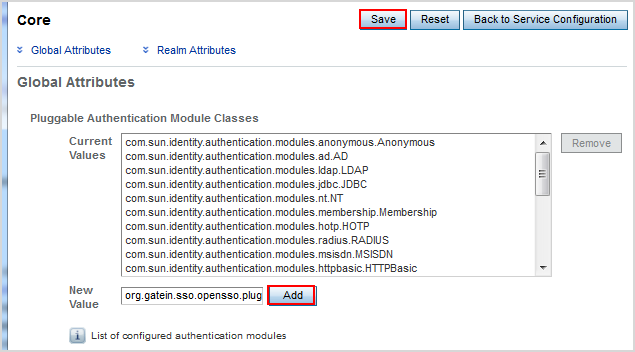
Select → → .
Enter org.gatein.sso.opensso.plugin.AuthenticationPlugin into the New Value field, then click Add and Save.
Note
This step is important for setup of GateIn Portal SSO AuthenticationPlugin to be available among other OpenAM authentication modules.
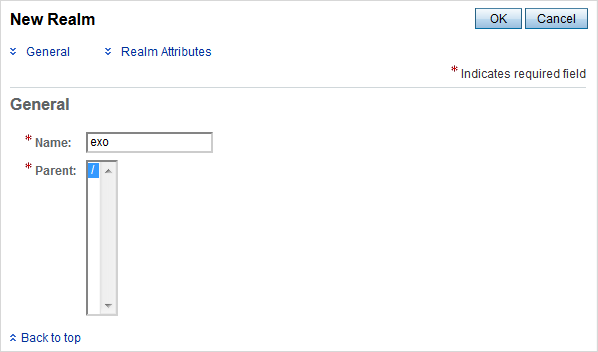
Click Back to Service Configuration, then select the Access Control tab, and click the New button to create a new realm, named "exo".
Enter exo into the Name field, then click OK.
Go to the "exo" realm and select the → . In the Authentication Chaining section, click ldapService. Here, change the selection from Datastore, which is the default module in the authentication chain, to AuthenticationPlugin, then click Save.

This enables the authentication of "exo" realm by using the eXo Platform REST service instead of the default DataStore.
Click Back to Authentication, then Back to Access Control. Here, select → → → → . In the User Profile form, change Required to Dynamic, then click Save.

Note
This step is needed because eXo Platform users are not in the OpenAM Datastore (LDAP server), so their profiles cannot be obtained if Required is active. By using Dynamic, all new users are automatically created in the OpenAM datastore after successful authentication.
Click Back to Service Configuration, then go to → → → . Here, increase the user privileges to allow the REST access by ticking the two checkboxes:
Read and write access only for policy properties
Read and write access to all realm and policy properties
Click → → to come back to the Realms window.
Select exo, then go to to increase the user privileges for exo realm as in Step 12, and click Save.

Now you can move to the next section to configure the eXo Platform server.
Configuring the OpenAM server for non-callback case
If you store users in an external datasource, configuring the OpenAM server is quite simple. You only need to create a new realm in OpenAM UI named "exo". Besides, for testing purpose, the following procedure includes steps of creating a user that is stored into the default DataStore of OpenAM.
Start OpenAM Tomcat server, then browse http://localhost:8888/openam. You will be redirected to the Configuration Options page.
Click the Create Default Configuration link. You will be auto-logged as a default user - amAdmin.
Enter passwords for Default User and Default Policy Agent, then click the Create Configuration button. Remember that these 2 passwords must be different.
You need to wait for some minutes when the OPENAM configuration is in progress. If the configuration is successful, you will receive a message stating "Configuration Complete!".
Click the Proceed to Login link.
Enter the username (amAdmin) and password created previously in the Sign in to OpenAM form, then click the LOG IN button. You will be redirected to the OpenAM homepage.
Select the Access Control tab, then click the New button to create a new realm, named "exo".
Enter exo into the Name field, then click OK.
Click the "exo" realm in the Access Control tab.
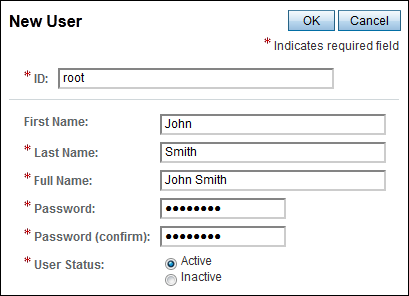
Create users for the "exo" realm by selecting Subjects tab, then clicking New.
Enter information for the user (ID = "root" and password = "12345678", for example) in the New User form, then click OK to finish.
Note
To make the user stored in an external datasource be able to access eXo Platform resources, ensure that the user is already registered in eXo Platform also. To make convenient for login and access to eXo Platform later (for testing purpose), the user identifier (ID in this example) created in the external datasource should be one username existing in eXo Platform.
Now you can move to the next section to configure the eXo Platform server.