In the above example (in both JBoss and Tomcat), the eXo Platform and SSO servers are deployed at localhost:8080 and localhost:8888. The above configuration works if both servers are deployed on the same machine or the same domain, like eXo Platform on portal.mydomain.com and SSO on openam.mydomain.com.
In case eXo Platform and SSO are deployed in different domains, for example, eXo Platform on portal.yourdomain.com:8080 and OpenAM on opensso.mydomain.com:8888/openam, you need to do some changes on both sides, as follows:
On portal side, change the configuration that you have done to
$PLATFORM_TOMCAT_HOME/gatein/conf/exo.properties(Tomcat), or$PLATFORM_JBOSS_HOME/standalone/configuration/gatein/exo.properties(JBoss) to have the following lines (see Configuration overview for this file):# SSO gatein.sso.enabled=true gatein.sso.callback.enabled=${gatein.sso.enabled} gatein.sso.login.module.enabled=${gatein.sso.enabled} gatein.sso.login.module.class=org.gatein.sso.agent.login.SSOLoginModule gatein.sso.server.url=http://opensso.mydomain.com:8888/openam gatein.sso.openam.realm=exo gatein.sso.portal.url=http://portal.yourdomain.com:8080 gatein.sso.filter.logout.class=org.gatein.sso.agent.filter.OpenSSOLogoutFilter gatein.sso.filter.logout.url=${gatein.sso.server.url}/UI/Logout gatein.sso.filter.login.enabled=false gatein.sso.filter.login.openamcdc.enabled=true gatein.sso.filter.login.sso.url=${gatein.sso.server.url}/cdcservletOn the OpenAM side, create an agent as follows:
i. Go to http://opensso.mydomain.com:8888/openam and log in as amAdmin.
ii. Go to → → → .
iii. Click New to create a new web agent through the wizard. You can use these properties:
Name: eXoAgent.
Password: Whatever you want. This password is not used for integrating OpenAM into eXo Platform. See the WebAgent policy in OpenAM documentation for more details.
Configuration: Centralized.
Server URL: http://opensso.mydomain.com:8888/openam.
Agent URL: http://portal.yourdomain.com:8080.
Note
If you have more portal servers on different hosts, you may want to create an agent for each of them. Look at OpenAM administration guide for more details.
For OpenAM 10.1+ (OpenAM 10.1.0 and 11.0.0 in this guideline)
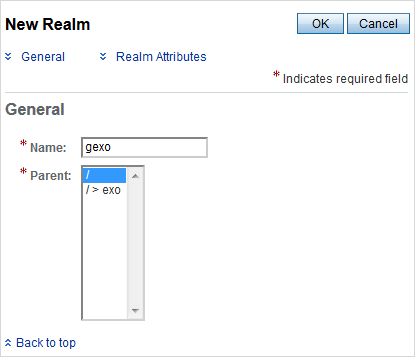
After following the above steps, you need to do the workaround by creating a new realm with the same configuration as that of the existing realm as follows:
Go to http://opensso.mydomain.com:8888/openam, then select Access Control tab. Here, create one new realm that has the same name as the existing realm but should be started with the character "g". For example, if your existing realm is "exo", you need to create another new realm named "gexo".
Click the newly created realm "gexo", then select the → . In the Authentication Chaining section, click ldapService. Here, change the selection from Datastore, which is the default module in the authentication chain, to AuthenticationPlugin, then click Save.
Click Back to Authentication, then Back to Access Control to come back to the Realms window.
Click the realm "gexo" again, then go to → . Here, increase the user privileges to allow the REST access by ticking the two checkboxes:
Read and write access only for policy properties
Read and write access to all realm and policy properties
Click → → .
Select Web subtab, and click New to create a new web agent for the realm "gexo", with the same properties as above.