JOSSO 2 has different approach than JOSSO 1.8. The idea is that even non-technical people are able to create their own SSO environment by model in flash web application called Atricore Console. But now it is much harder to plug the GateIn SSO Authentication plugin as it is is not easily possible to configure existing JOSSO 2 environment via Spring XML files similarly like it was with JOSSO 1.8.
So in reality, eXo Platform does not support plugging the GateIn SSO Authentication plugin into JOSSO 2. However, the Agent part is still supported, so nothing is changed from the portal perspective.
Installation of eXo JOSSO add-on
Install JOSSO add-on with the command:
$PLATFORM_HOME/addon install exo-josso
Downloading and Installing JOSSO 2 package
For JOSSO 2.2.0
First, download JOSSO 2.2.0 from JOSSO site and follow the instructions at JOSSO 2 Quickstart.
Note
One important note is that JOSSO 2.2.0 depends on some artifacts of JOSSO 1.8.5
that were removed from the Maven repository used by JOSSO 2.2.0.
That's why you may meet certain failures when deploying or starting your Identity appliance on Atricore Console.
To workaround them, you need to copy all file in $PLATFORM_HOME/josso-plugin/josso-2.2.0/m3-local-repository into the Maven local repository of JOSSO package ($JOSSO_TOMCAT_HOME/m3-local-repository). Besides, JOSSO 2.2.0 requires Java 6 as Runtime Environments so you need to temporarily install this version until all the steps of this section are finished. After which, you can change into Java 7 to work with eXo Platform.
For JOSSO 2.3.1 and 2.4.0
Download the JOSSO 2.3.1 jar file here and JOSSO 2.4.0 jar file here.
Install these files into new empty folders named
josso-ce-2.3.1andjosso-ce-2.4.0respectively by running:- java -jar josso-ce-2.3.1-windows.jar for JOSSO 2.3.1
- java -jar josso-ce-2.4.0-windows.jar for JOSSO 2.4.0
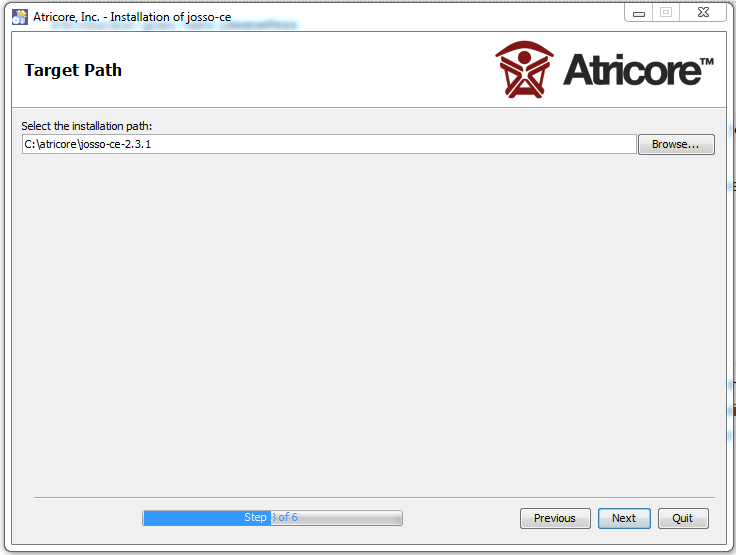
Do as instructions by clicking Next button to go to step 3. Then, browse to your created corresponding folders to start installation. For example with JOSSO 2.3.1:
After finishing this installation, you will see this windows:
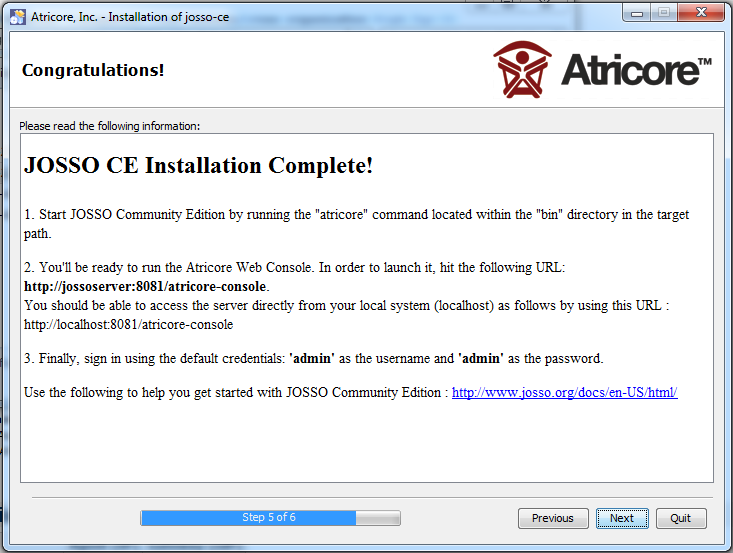
Click Next to finish all steps.
Note
Notice that you do not need to copy eXo JOSSO plug-in files into the Maven local repository of these JOSSO versions. However, JOSSO 2.3.1 is the same as JOSSO 2.2.0 at requiring Java 6 as Runtime Environments, while JOSSO 2.4.0 is now compatible with Java 7.
Assume you have unzipped and run the JOSSO successfully (using atricore.bat on Windows or atricore on Ubuntu, in $JOSSO_TOMCAT_HOME/bin) and now can access Atricore Console on http://server.local.network:8081/atricore-console
(server.local.network is the virtual host defined in /etc/hosts). Notice that the illustrative figures below are based on JOSSO 2.2.0, for version 2.3.1 and 2.4.0 there could be several additional configurations, that time you just need to let them at default settings. For more information, please refer to http://www.josso.org.
Log in as admin/admin for JOSSO 2.2.0 or 2.3.1, and admin/atricore for JOSSO 2.4.0.
Create a new empty Identity appliance by selecting → :
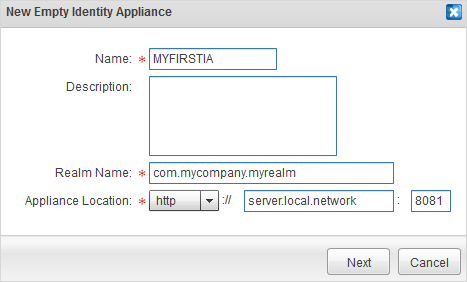
Name: MYFIRSTIA
Realm name: com.mycompany.myrealm
Appliance location: http://server.local.network:8081
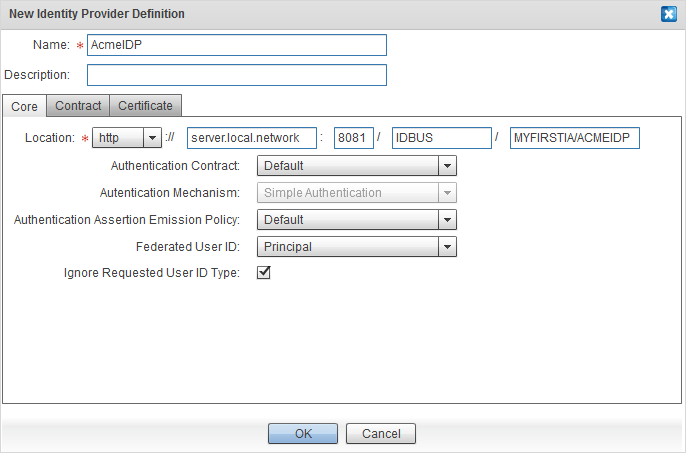
Create a new Identity provider named AcmeIDP ( → ), then let all options default.
Create Identity vault IDPUsers ( → ) and connect it with AcmeIDP via the Identity Lookup connection ( → ).
Note
For JOSSO 2.4.0, select Default Identity Vault option in the field Identity Vault.
Create Service provider called SP1 ( → ) but let the hosts to be on server.local.network:8081.
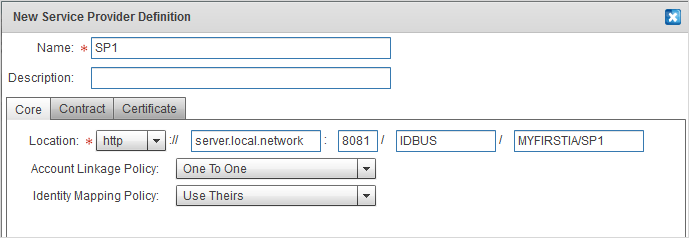
Create Identity vault SP1Users ( → ) and wire it with SP1 via the Identity Lookup connection ( → ).
Note
For JOSSO 2.4.0, skip this step - do not create and wire SP1Users with SP1.
Create a Tomcat directory (for example,
D:\temp\tomcat7) on your file system. Then, in Atricore Console, create a new Execution environment of the Tomcat type with params ( → ):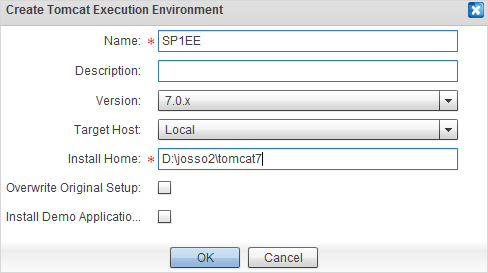
Name: SP1EE
Version: 7.0.x
Target host: Local
Install home: D:\temp\tomcat7
Wire SP1 and SP1EE via connection of the Activation type ( → ). The parameters include:
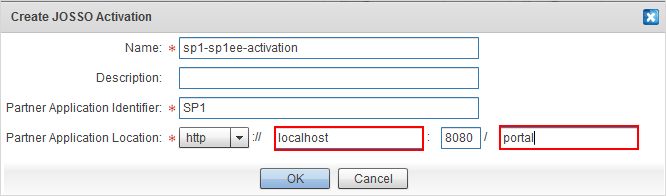
The partner application location: http://localhost:8080/portal.
The default values for other parameters.
Note
For JOSSO 2.4.0, you can not wire SP1 and SP1EE directly, you will have to create a JOSSO 1 resource ( → ) with params:
Name: JOSSO1-RE
Partner Application Location: http://localhost:8080/portal
Then wire JOSSO1-RE into SP1 by a Service connection ( → ) and JOSSO1-RE into SP1EE by Activation connection ( → ).
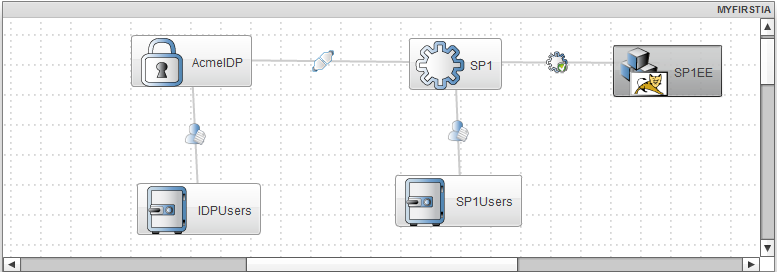
Wire SP1 and AcmeIDP via connection of the Federated connection type ( → ).
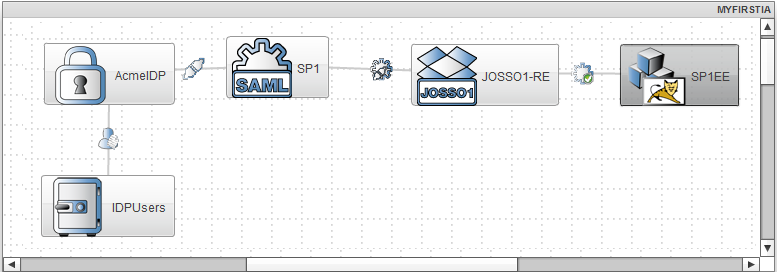
Click to save this model. The model created in JOSSO 2.2.0 and 2.3.1 will look like:
For JOSSO 2.4.0, you will have a JOSSO1 resource included as follows:
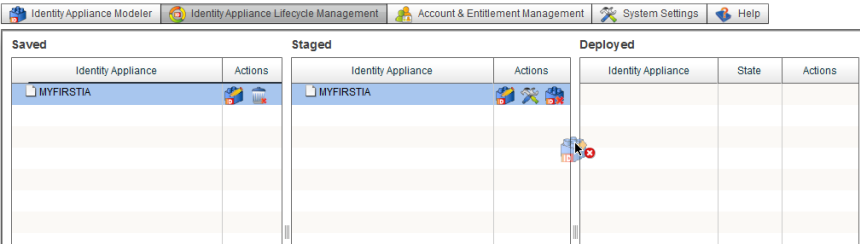
Go to the Identity Appliance Lifecycle Management tab, then drag and drop the Identity appliance (MYFIRSTIA) throughout its lifecycle (Saved => Staged => Deployed) as suggested in JOSSO 2 Quickstart. In the Deployed column, click the Start icon to start MYFIRSTIA.
Go to the Account & Entitlement Management tab and create some users whose usernames are as the same as existing ones on eXo Platform. You need to add users in this way, because the REST callbacks to eXo Platform are not supported at this moment.
Configuring eXo Platform server
In Tomcat
Edit the $PLATFORM_TOMCAT_HOME/gatein/conf/exo.properties file by adding/modifying the following lines
(see Configuration overview for this file):
# SSO
gatein.sso.enabled=true
gatein.sso.callback.enabled=${gatein.sso.enabled}
gatein.sso.login.module.enabled=${gatein.sso.enabled}
gatein.sso.login.module.class=org.gatein.sso.agent.login.SSOLoginModule
gatein.sso.filter.initiatelogin.enabled=false
gatein.sso.filter.initiatelogin.josso2.enabled=true
gatein.sso.josso.agent.config.file=sso/josso/2.2/josso-agent-config.xml
gatein.sso.josso.properties.file=file:${PLATFORM_TOMCAT_HOME}/gatein/conf/exo.properties
gatein.sso.portal.url=http://localhost:8080
gatein.sso.filter.logout.class=org.gatein.sso.agent.filter.JOSSOLogoutFilter
gatein.sso.filter.logout.url=
gatein.sso.josso.host=server.local.network:8081
gatein.sso.server.url=http://${gatein.sso.josso.host}
gatein.sso.josso.identityApplianceId=MYFIRSTIA
gatein.sso.josso.partnerAppId=SP1
gatein.sso.josso.partnerAppPoint=SP1EE
gatein.sso.filter.login.sso.url=${gatein.sso.server.url}/IDBUS/${gatein.sso.josso.identityApplianceId}/${gatein.sso.josso.partnerAppPoint}/JOSSO/SSO/REDIR?josso_back_to=${gatein.sso.portal.url}/@@portal.container.name@@/josso_security_check&josso_partnerapp_id=${gatein.sso.josso.partnerAppId}
Once again, gatein.sso.josso.properties.file points to the exo.properties file. Use the absolute path of your current $PLATFORM_TOMCAT_HOME folder.
In JBoss
Edit the
$PLATFORM_JBOSS_HOME/standalone/configuration/gatein/exo.propertiesfile by adding/modifying the following lines (see Configuration overview for this file):# SSO gatein.sso.enabled=true gatein.sso.callback.enabled=${gatein.sso.enabled} gatein.sso.login.module.enabled=${gatein.sso.enabled} gatein.sso.login.module.class=org.gatein.sso.agent.login.SSOLoginModule gatein.sso.filter.initiatelogin.enabled=false gatein.sso.filter.initiatelogin.josso2.enabled=true gatein.sso.josso.agent.config.file=sso/josso/2.2/josso-agent-config.xml gatein.sso.josso.properties.file=file:${jboss.home.dir}/standalone/configuration/gatein/exo.properties gatein.sso.portal.url=http://localhost:8080 gatein.sso.filter.logout.class=org.gatein.sso.agent.filter.JOSSOLogoutFilter gatein.sso.filter.logout.url= gatein.sso.josso.host=server.local.network:8081 gatein.sso.server.url=http://${gatein.sso.josso.host} gatein.sso.josso.identityApplianceId=MYFIRSTIA gatein.sso.josso.partnerAppId=SP1 gatein.sso.josso.partnerAppPoint=SP1EE gatein.sso.filter.login.sso.url=${gatein.sso.server.url}/IDBUS/${gatein.sso.josso.identityApplianceId}/${gatein.sso.josso.partnerAppPoint}/JOSSO/SSO/REDIR?josso_back_to=${gatein.sso.portal.url}/@@portal.container.name@@/josso_security_check&josso_partnerapp_id=${gatein.sso.josso.partnerAppId}Uncomment the below login module in
$PLATFORM_JBOSS_HOME/standalone/configuration/standalone-exo.xml, then change${gatein.sso.login.module.enabled}and${gatein.sso.login.module.class}into#{gatein.sso.login.module.enabled}and#{gatein.sso.login.module.class}respectively.<login-module code="org.gatein.sso.integration.SSODelegateLoginModule" flag="required">
<module-option name="enabled" value="#{gatein.sso.login.module.enabled}"/>
<module-option name="delegateClassName" value="#{gatein.sso.login.module.class}"/>
<module-option name="portalContainerName" value="portal"/>
<module-option name="realmName" value="gatein-domain"/>
<module-option name="password-stacking" value="useFirstPass"/>
</login-module>
Testing this integration
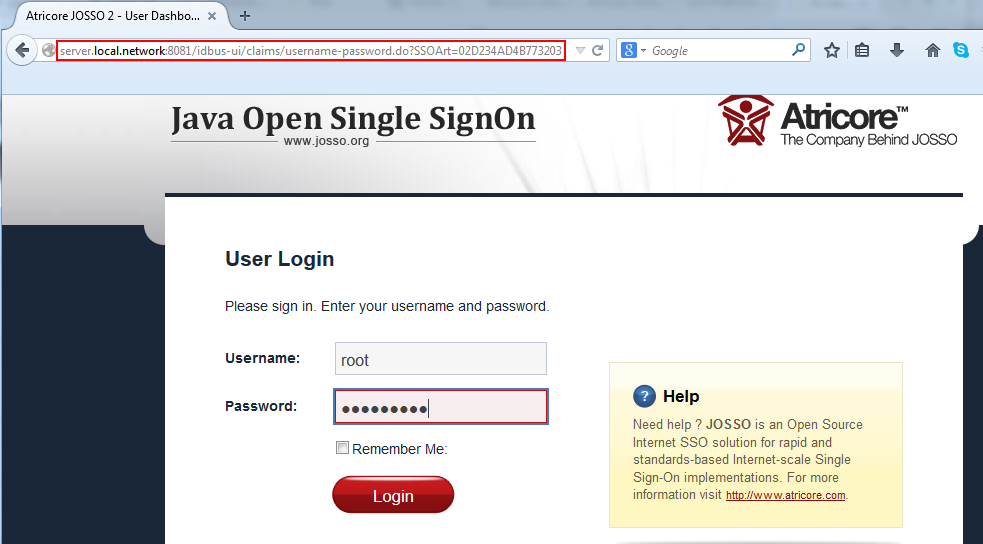
After successful integration, when you use localhost:8080/portal/ to go to eXo Platform, you will be auto-redirected to the JOSSO centralized authentication form not the eXo Platform one:
From JOSSO 2.4.0 the login interface has changed:
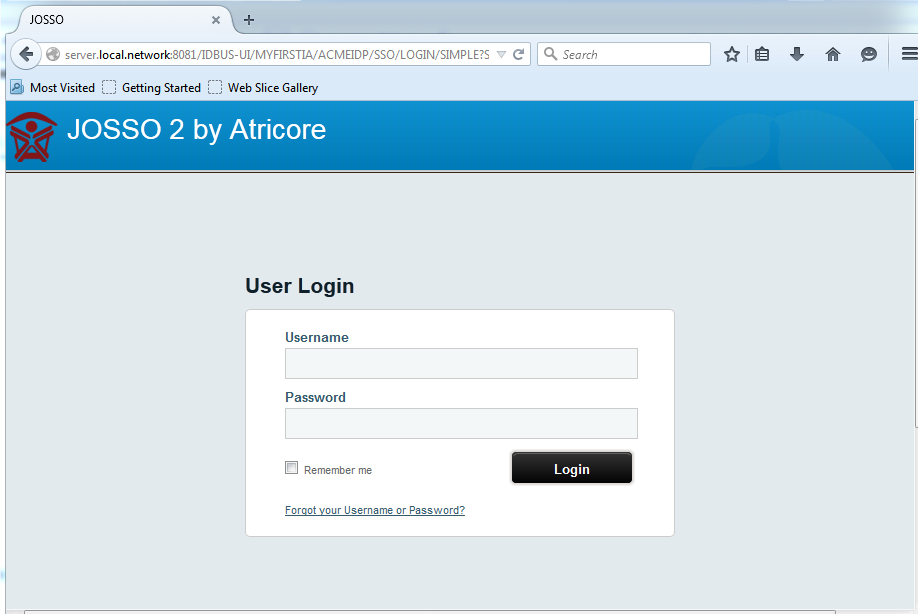
Now, log in with the credentials created in Step 12 (the usernames are as the same as ones in eXo Platform).