Warning
You are looking at documentation for an older release. Not what you want? See the current release documentation.
In this section, you will set up two SAML2 scenarios with eXo Platform and Salesforce:
Note
Configurations and UI at Salesforce side can be changed by Salesforce and may depend on your Salesforce edition and license. If you have problems when following the instruction here, please consult Salesforce support and documentation, and leave a feedback to help us keep eXo documentation up-to-date.
In this guideline, let's assume that you start from the beginning and register a free Salesforce developer account to test, as follows:
Sign up at http://developer.force.com/.
Set up your domain by selecting → → .

Configuring Salesforce as SAML2 SP
Set up SSO by clicking → → , then select Edit and check SAML Enabled.
Create a new SAML Single Sign-On Setting and complete the screen as below:
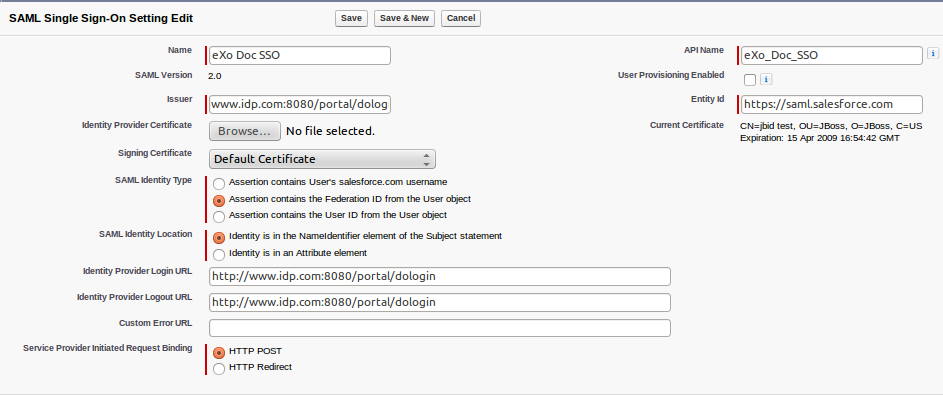
Issuer: The eXo Platform IDP URL, like http://www.idp.com:8080/portal/dologin.
SAML Identity Type: Select Assertion contains the Federation ID from the User object.
SAML Identity Location: Select Identity is in the NameIdentifier element of the Subject statement.
Identity Provider Login(/Logout) URL: http://www.idp.com:8080/portal/dologin.
Entity ID: Now, it should be https://saml.salesforce.com.
Certificate: Export a
.crtfile from your keystore to be uploaded here. The command to export:keytool -export -keystore secure-keystore.jks -alias secure-key -file test-certificate.crt
Note
If you are using default
jbid_test_keystore.jks(for testing only), the keystore password is store123 and the security alias is servercert.
Back to the My Domain screen and edit the Login Page Branding section. Check your SSO Setting item(s) in the Authentication Service.

The default "Login Page" allows you to log in Salesforce in case the IDP is not available, so it is safe in testing. Depending on Salesforce, you may have the ability to enable/disable SSO for individual users (via User Profile and Permission Set). For now, do not uncheck Login Page.
Configure eXo Platform IDP as described in eXo Platform as SAML2 IDP. Then update
gatein.sso.sp.domainsandgatein.sso.sp.hostas below:gatein.sso.sp.domains=saml.salesforce.com gatein.sso.sp.host=saml.salesforce.com
Edit
$PLATFORM_IDP/standalone/deployments/platform.ear/exo.portal.web.portal.war!/WEB-INF/conf/sso/saml/picketlink-idp.xmlby making this step:Add domain
:saml.salesforce.comas aValidatingAlias<KeyProvider ...>
<ValidatingAlias Key="${gatein.sso.sp.host}" Value="secure-key"/>
<ValidatingAlias Key="saml.salesforce.com" Value="salesforce-cert"/>
</KeyProvider>
Where
salesforce-certis the alias that you will import to your keyfile in later step.
Download SP Metadata file from your Salesforce SSO Setting page, by clicking , then save this file with name
sp-metadata.xml.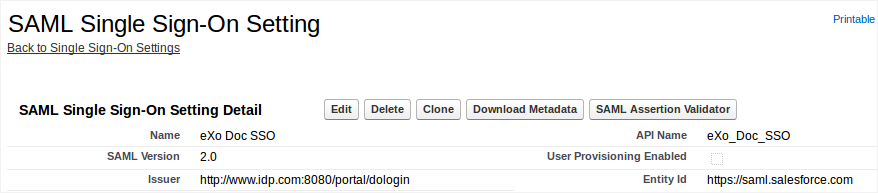
Edit the downloaded
sp-metadata.xmlfile then addEntitiesDescriptoras root tag of this xml file. This file will look like:<md:EntitiesDescriptor xmlns:md="urn:oasis:names:tc:SAML:2.0:metadata" xmlns:ds="http://www.w3.org/2000/09/xmldsig#" entityID="https://saml.salesforce.com" validUntil="2025-01-09T02:22:00.551Z">
<md:EntityDescriptor xmlns:md="urn:oasis:names:tc:SAML:2.0:metadata" xmlns:ds="http://www.w3.org/2000/09/xmldsig#" entityID="https://saml.salesforce.com" validUntil="2025-01-09T02:22:00.551Z">
....
</md:EntityDescriptor>
</md:EntitiesDescriptor>
In the file
sp-metadata.xml, update the value ofAuthnRequestsSignedfrom true to false.Copy this
sp-metadata.xmlfile into$PLATFORM_IDP/standalone/deployments/platform.ear/exo.portal.web.portal.war!/WEB-INF/conf/sso/saml/Edit the file
$PLATFORM_IDP/standalone/deployments/platform.ear/exo.portal.web.portal.war!/WEB-INF/conf/sso/saml/picketlink-idp.xmlto add MetaDataProvider element as follows:<PicketLinkIDP ...>
...
<MetaDataProvider ClassName="org.picketlink.identity.federation.core.saml.md.providers.FileBasedEntitiesMetadataProvider">
<Option Key="FileName" Value="/WEB-INF/conf/sso/saml/sp-metadata.xml"/>
</MetaDataProvider>
</PicketLinkIDP>
Download and import Salesforce client certificate:
Download a new certificate from this link. It will downloads a zip file.
Unzip the downloaded file.
Import the certificate into your keystore:
For your secure keystore:
keytool -import -keystore secure-keystore.jks -file proxy-salesforce-com.123 -alias salesforce-certFor default
keytool -import -keystore jbid_test_keystore.jks -file proxy-salesforce-com.123 -alias salesforce-certjbid_test_keystore.jkskeystore:
Testing the scenario
Create some users in Salesforce and eXo Platform IDP for testing. The users mapping uses Federation ID, that means the username "john" in eXo Platform must be the same as the Federation ID "john" in Salesforce.
Log out Salesforce, then re-login using your domain (https://exodoc-dev-ed.my.salesforce.com/ for example).
Now, you will see a link to IDP Login page in the login screen, like "eXo Doc SSO" (Name of your Salesforce SSO Setting above) in the screenshot:
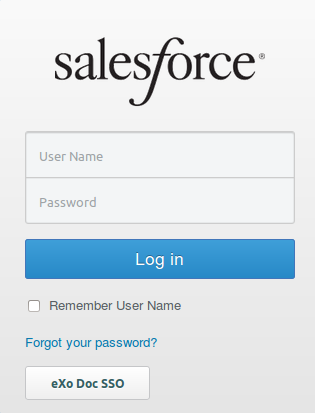
Click the link. You will be redirected to the eXo Platform login screen.
Log in as one of testing users. You will get access to your Salesforce domain.
Note
Remember to disable SSO if you have enabled as described in Configuring Salesforce as SAML2 SP.
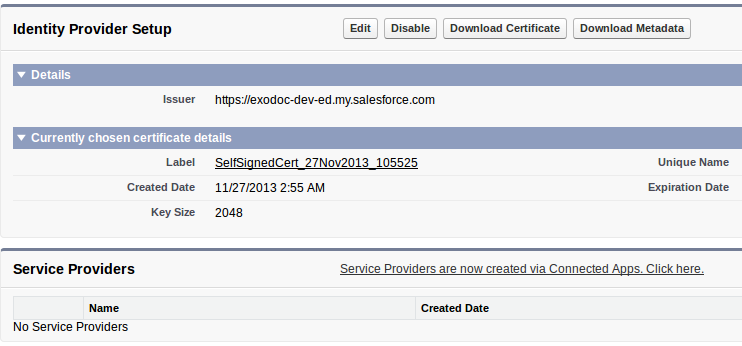
Configuring Salesforce as SAML2 IDP
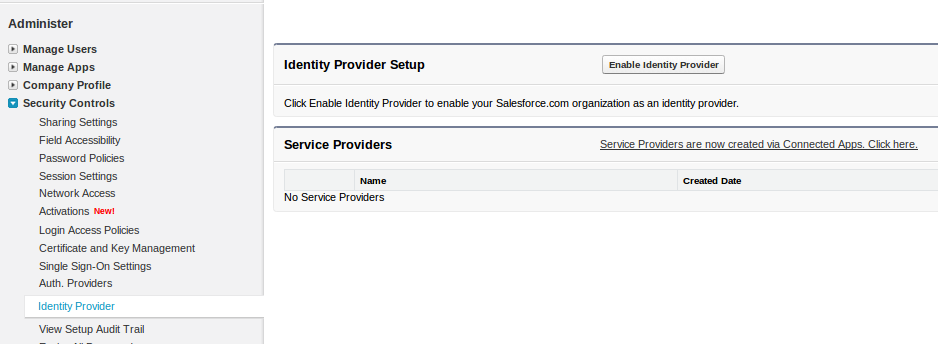
Enable Identity Provider by clicking → → , then click Enable Identity Provider.
Accept the default certificate by clicking Save. You can change it later if you need.
Create Connected Apps, as follows:
i. Click the link in the Service Providers section:
ii. Fill in all required information. In the Web App Settings section, check Enable SAML and complete the following information:
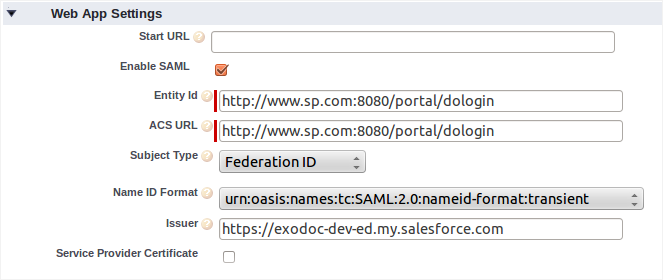
Entity ID: The SP login URL, like http://www.sp.com:8080/portal/dologin.
ACS URL: The URL of the Assertion Consumer Service. In this scenario, it is http://www.sp.com:8080/portal/dologin too.
Subject Type: Select Federation ID.
Name ID Format: Select urn:oasis:names:tc:SAML:2.0:nameid-format:transient.
Issuer: Use your domain like https://exodoc-dev-ed.my.salesforce.com.
Note
You can also create Connected Apps by selecting → → .
Make sure your connected application can be accessed by users who have the "Standard Platform User" profile, as follows:
i. Click → .

ii. Find your app and click to view it. In the Profiles section, you can manage Profiles that have access to your app. At this time, make sure you see the "Standard Platform User" because this is needed for testing later.
Configurations at eXo Platform
Configure eXo Platform as described in eXo Platform as SAML2 SP. Notice some values below:
gatein.sso.idp.host=exodoc-dev-ed.my.salesforce.com
gatein.sso.idp.url=https://exodoc-dev-ed.my.salesforce.com/idp/endpoint/HttpPost
gatein.sso.sp.url=http://www.sp.com:8080/portal/dologin
Download and import Salesforce IDP certificate to your keystore. The Salesforce IDP certificate is downloaded from the Identity Provider page.

Import the downloaded certificate to your keystore:
keytool -import -keystore secure-keystore.jks -file SelfSignedCert_17Oct2013_070921.crt -alias salesforce-idpFor default keystore
keytool -import -keystore jbid_test_keystore.jks -file SelfSignedCert_17Oct2013_070921.crt -alias salesforce-idpjbid_test_keystore.jks, the command is:SelfSignedCert_17Oct2013_070921.crtis the downloaded fileModify
$PLATFORM_SP/standalone/deployments/platform.ear/exo.portal.web.portal.war/WEB-INF/conf/sso/saml/picketlink-sp.xmland update the value ofValidatingAliaskey ${gatein.sso.idp.host} to salesforce-idp.<ValidatingAlias Key="${gatein.sso.idp.host}" Value="salesforce-idp"/>Start up the Platform as SP.
Testing the scenario
Create some users in Salesforce and eXo Platform SP for testing. The users mapping uses Federation ID, that means the username "john" in eXo Platform must be the same as the Federation ID "john" in Salesforce. Also, make sure the Salesforce user has the "Standard Platform User" profile (to have access to the Connected App, as explained before).
Now, access eXo Platform. You will be redirected to the Salesforce login page. After getting authenticated with Salesforce username (like john@example.com), you get access to eXo Platform.