After new content has been created, it is saved as draft and must be approved before publishing by the web-contributors or administrator. The publication process consists of three steps:
→ → .
Sending the approval request
If you want to publish your content without having the "Approve" or "Publish" right, you first need to
send a request for approval by clicking
 on the
Action
bar.
on the
Action
bar.
Approving the content
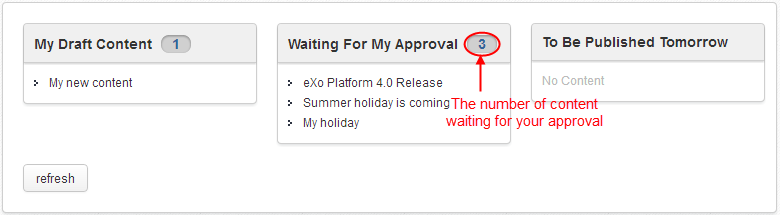
If you has the right to approve or publish content, you will see a list of content waiting for your approval at the bottom of the Sites Explorer.
To approve the content, do as follows:
Click your desired content to view it.
Click
 on the
Action
bar to approve the content.
on the
Action
bar to approve the content.
Note
If you have the right to publish content, you can publish it immediately without the Approval step.
After approved/published, the content is removed from the list of Waiting For My Approval at the bottom of the Sites Explorer.
Publishing content
You can an quickly publish content by opening your desired content, then
clicking
 .
.
This function allows you to manage the content publication. You can publish or unpublish any content or publish the content in a given period. Also, you can review the publication history of the content.
Select content (on the left or right pane) which you want to manage its publication.
Click
![[ Manage Publications ]](images/ecms/publications_button.png) on the Action bar.
on the Action bar.
The Manage Publication form appears.
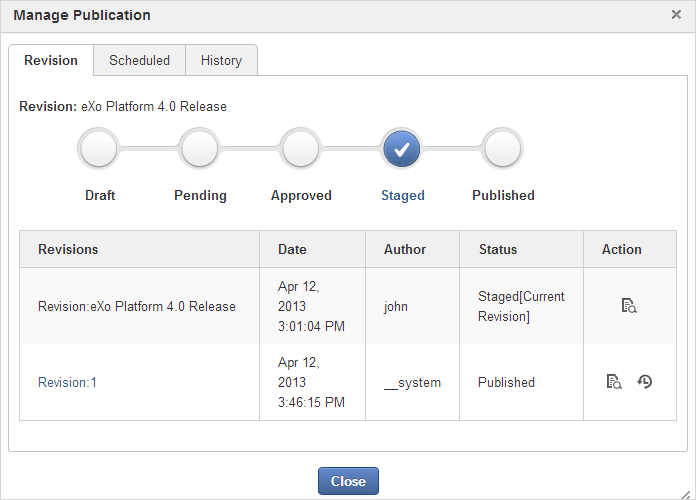
The Revision tab displays some basic information and the current state of the selected node.
The
 icon allows you to view the content of the node.
The
![[ Restore Version ]](images/ecms/restore_icon.png) icon allows you
to restore a version of the node (refer to Activating document versioning for more details).
icon allows you
to restore a version of the node (refer to Activating document versioning for more details).
The Scheduled tab allows you to publish content in a period.
The History tab allows you review the publication history of the content.
Set the status for the content by ticking the corresponding checkbox in the Revision tab.
Draft: The content is in draft.
Pending: The content is waiting for approval to publish.
Approved: The content is approved.
Scheduled: The content is published in a period. When checking this checkbox, you will see the Scheduled tab. Select this tab, then click From/To to select the start and end dates for publication from a mini-calendar.
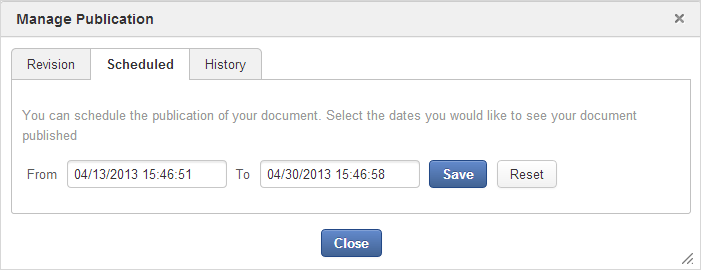
Click to accept publishing the content as the schedule.
Note
To publish your content forever, you should not set time in the To field.
Published: The content is published immediately and permanently.
Click to quit the form.