You may create a personal calendar or group calendar that can be shared with specific users or groups to your desires. You can also create a calendar which is synchronized with a remote calendar.
Note
All personal calendars will be put in the Personal Calendars pane.
Click
 , then select Add Calendar from the drop-down menu.
Fill in fields of the Details tab.
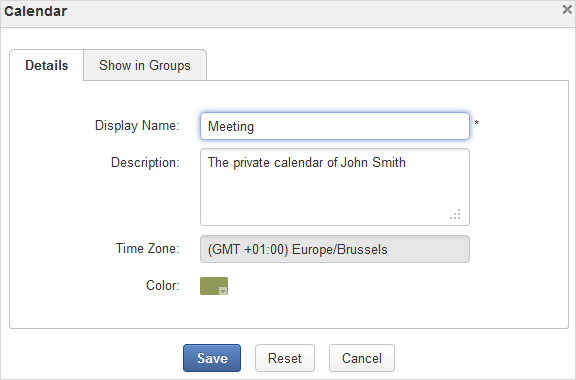
Details:
Field Description Display Name The calendar name which is displayed.
Description The brief description of the calendar. Time Zone The display time zone for the calendar activities which cannot be edited. However, you can change the time zone in your calendar settings.
Color The display color of the calendar activities that can be personalized.
Note
If you select the Show in Groups tab, then click
 to define specific groups and click
  , the calendar will be put in the Group Calendars category, not in the Personal Calendars category.
Click Save to finish your creation.
Note
All group calendars will be put in the Group Calendars pane.
Follow steps as stated in Creating a personal calendar to give details for your new calendar.
Select the Show in Groups tab.
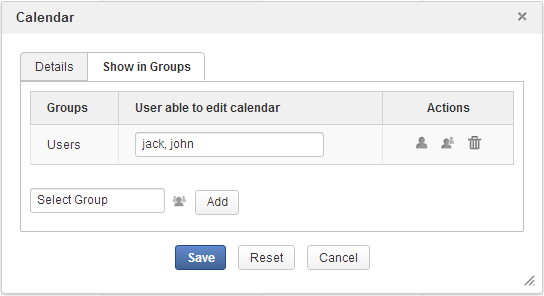
Select groups that contain your created calendar. The users of the selected groups can only view this calendar.
i. Click
 to open the Group Selector form.
This form will help you select a group that you want to share.
to open the Group Selector form.
This form will help you select a group that you want to share.
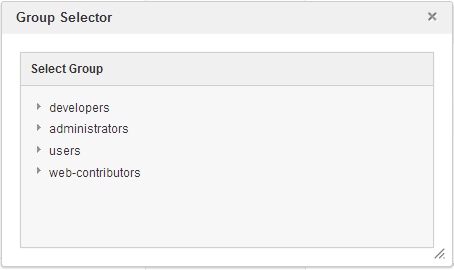
ii. Click your desired group, then select
to add the defined group.
iii. Click
 or
or  to grant permissions to specific users or memberships respectively from the selected group.
Note
You can select more users/memberships by repeating the above steps. The selected users/memberships will be updated in corresponding textboxes.
You can delete your selected users/memberships manually in the textboxes or click
 to remove the permissions.
Click to finish creating your new group calendar.
Note
To create a remote calendar in the Calendar application successfully, you need to learn about the calendar settings of the relevant provider. For more information about types of remote calendars, see here.
Click
, then select Remote Calendar from the drop-down menu. The Subscribe Calendar form appears.
Select the type of the remote calendar: iCalendar or CalDAV.
Enter the URL linking to your calendar server in the URL field.
Click to go to the Remote Calendar form.
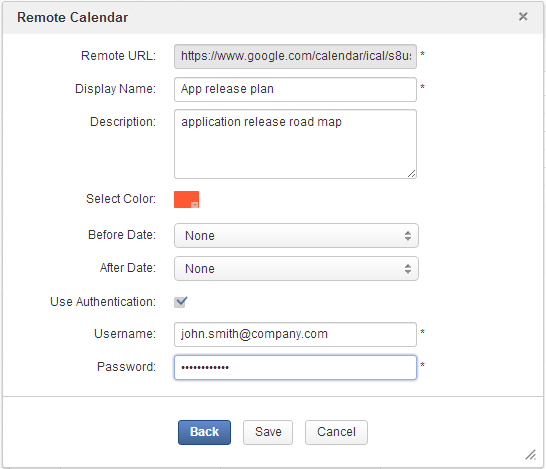
Fill in the fields. The asterisk (*) indicates the field is mandatory.
Tick the Use Authentication checkbox, then enter the username and password of your remote calendar server if the remote server requires verification.
Click to accept your creation.
Note
After creating a remote calendar, you can ONLY VIEW all events and tasks which are created in the remote calendar server right in
the Calendar application by clicking it. To get the updates, hover your cursor over the remote calendar, then click ![]() to select Refresh from the drop-down menu.
to select Refresh from the drop-down menu.
More information about types of remote calendars:
iCalendar:
iCalendar provides a link to an online .ics file from another calendar servers, such as Google Calendar, Yahoo Calendar, or eXo Calendar (including public URL or private URL).
An example of a Google Calendar URL:
http://www.google.com/calendar/ical/Webdesignteam%40gmail.com/public/basic.ics
CalDAV:
CalDAV is an open protocol that allows you to access calendars via WebDAV. With CalDAV, you can publish and subscribe to calendars, share them collaboratively, synchronize among multiple users or devices.
Google: https://www.google.com/calendar/dav/your_gmail_account@gmail.com/events/
Yahoo: https://caldav.calendar.yahoo.com/dav/your_yahoo_account@yahoo.com/Calendar/calendar_name/
For example:
https://www.google.com/calendar/dav/hoavuvn@gmail.com/events/