This feature enables you to auto-complete the word, including keywords, statements, declared variables, properties and methods, functions, objects, classes, tags, attributes, annotations in context of JavaScript, HTML, XML, Google Gadget, REST Service, Template, POGO, Netvibes Widget, Data Object files simply by clicking Ctrl+Space hotkeys. The Auto-complete form is shown as below:
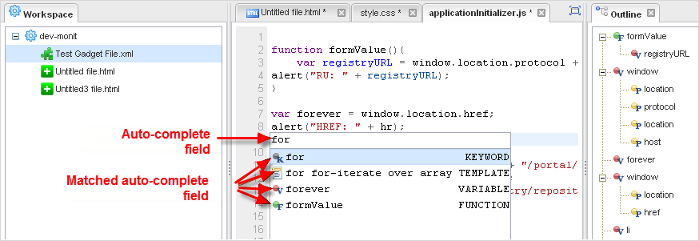
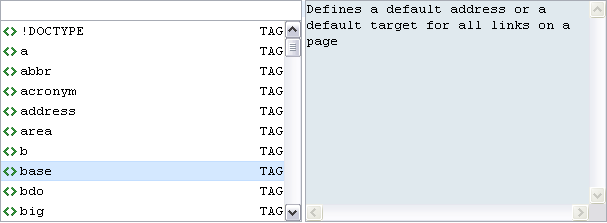
In the files of Google Gadget, HTML and Template types, the auto-complete list displays various content for each case, depending on the cursor position within the file. If the cursor is put between <script> tags, or between <style> tags, there will be the auto-complete list for JavaScript content, or for CSS content respectively. In the other places, the auto-complete list for the HTML content is displayed.
Using the Auto-complete function
Open the target file with supported file types (JavaScript, CSS, HTML, Google Gadget, ECM Template and others) with the Code editor.
Put the cursor on the needed position in the document.
Press Ctrl+Space to get the Auto-complete form.
Select the token in the list of this form; or type first letters of the token to reduce the token list and then select the appropriate token.
Press Enter or double-click the selected token to complete the word next to the cursor.
Note
Use Alt+Space hotkeys instead of Ctrl+Space in the Mac OS.
Click the outside area of the form to quit the Auto-complete form.
Press Esc to discard the Auto-complete form.
There are some special template tokens in the auto-complete list to insert the code template. For example, the if-condition template is shown as below:
if (condition)
{

}
Template tokens have the special icons as shown in the Auto-complete form and tokens of different types are marked with different colors, including:
| Token | Marked color |
|---|---|
| Function name | Green |
| Variable name | Red |
| Javascript key | Grey |
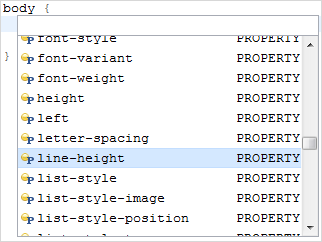
In the CSS file, the auto-complete list contains all the properties of Cascading Style Sheets. They are marked with the yellow token icons.
There are two HTML auto-complete lists: one of all HTML tags, and the other of all properties of the pointed tag.
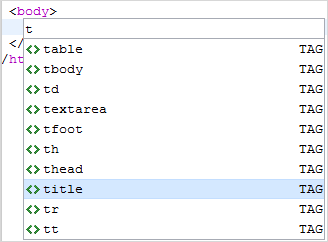

Also, you can call the CSS properties and JavaScript auto-complete list if your current cursor position is inside <style> or <script> tags respectively.
For the XML files, there is only one auto-complete list for the previously typed tag. There is no schema or namespace analysis.
Currently, the auto-complete list of the ECM Template files is the same as that of the HTML files. Moreover, the content between Groovy tags <% %> is ignored.
The auto-complete list of the Netvibes Widget files is the same as that of the HTML files.
The auto-complete list inside JavaScript tags is the composition of the JavaScript auto-complete list and Netvibes snippets:
JSON request snippet
Flash object snippet
Pager Control snippet
Tabview Control snippet
Thumbnailed List snippet
eXo IDE supports auto-complete for Netvibes Universal Widget.

It is possible to auto-complete the created Netvibes object's properties and methods.

You can get more details about this snippet and code that will be inserted via the hint window of the Auto-complete form.
eXo IDE currently supports special features for the Groovy code auto-complete list, including REST Service ("application/x-jaxrs+groovy"), POJO ("application/x-groovy") and Data Object ("application/x-chromattic+groovy"). The auto-complete list varies, depending on Java types and is shown in the following cases:
<local variable name>
<object's field name>
<static field name>
<method's parameter name>
<class name>
@<annotation name>
in the line after the space
IDE compiles classes, which are described in the project's classpath, before generation of the auto-complete list. If the compilation of some classes is failed, the error message will appear in the Output panel instead of Auto-complete form as shown below:
[ERROR] Error (500: Internal Server Error)
startup failed, /ide-project/data/Pojo.groovy: 9: unexpected token: vpid @ line 9, column 3.
vpid fg(){
^
To display classes from folder described as folder source in the project's classpath, in the Auto-complete form, the files with such classes must fulfill the following conditions:
Be located in folder with respect to package structure.
Have the same file name as the class name located in a file.
Have the .groovy or .grs extension.
The Groovy code specific auto-complete list supports 5 cases as follows:
You can view class's JavaDoc and class name from the Auto-complete form. eXo IDE provides appropriate import statement into the file header automatically, if needed. There is a list of default packages for the Groovy code and so are imported explicitly:
There is a list of default packages for the Groovy code and so are imported explicitly:
java.lang
java.io
java.lang
java.math.BigDecimal
java.math.BigInteger
java.net
java.util
groovy.lang
groovy.util

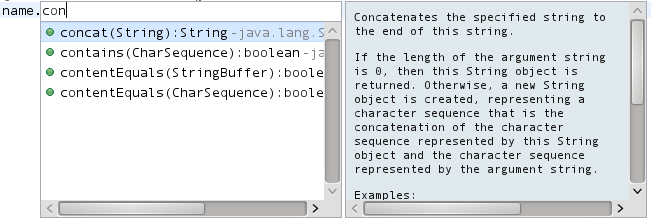
Object's fields and methods auto-completion
You can also view JavaDoc and auto-complete the object's fields and methods as follows:
Print the instance name with the dot (.) at the end.
Press Ctrl+Space to view all public methods and fields of the object. The JavaDoc for the selected field or method is shown.
Select the appropriate item in the Auto-complete form and press the Enter key; or double-click this item.
Static fields and methods auto-completion
eXo IDE supports the auto-completion of static fields, methods and object's fields and methods.
Note
The auto-completion for methods and fields of the class or instance can only work if it is called after the symbol ".".
It is possible to auto-complete the annotations, followed by the symbol "@". The Auto-complete form for annotation contains the list of available annotations like this:

Local variables and parameters auto-completion
Local variables and method's parameters are marked with
 in the
Auto-complete
form. eXo IDE supports the auto-completion for local variables and method's parameters.
Besides, the keywords of Groovy code are not marked with icons in the auto-complete list.
If you forget to insert the import statement, the line with error will be marked as follows.

Viewing and fixing the Java types error
Hover the cursor over error marks to see the error message in tooltips.
Click the error icon in the Line numbers field.
Select the appropriate import statement and press the Enter key; or double-click to insert it into the header of the file.