Apache or Nginx can be used as a reverse proxy in front of eXo Platform. It catches https requests from the browser and proxies the requests to eXo Platform via either AJP or HTTP protocol. The following diagram depicts the case described in this section:
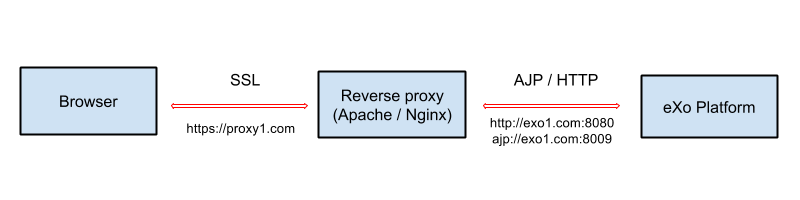
In this case, a user accesses the site via https, for example https://proxy1.com, all his requests and all reponses to him are encrypted by the proxy.
AJP or HTTP?
You always can use HTTP protocol between the proxies and eXo Platform. For AJP, there are some considerations:
For Apache, AJP is recommended for some reasons, especially if you are using mod_jk. See a recommendation here.
For Nginx, there are available AJP modules and you can use one at your own risk. Because of the fact that no AJP module is listed at Nginx modules or Nginx third party modules as well, in this documentation, only HTTP configuration is described.
Importing your SSL certificate into Java truststore
You need an SSL certificate for enabling https access to your site. You will configure your certificate in your front-end server (proxy1.com). Besides, you need to add the certificate to JVM truststore. For testing purpose, you can generate and use a self-signed certificate, as follows:
Create a certificate using openssl (if you are using Windows, replace parentheses with quotation marks): openssl req -x509 -nodes -newkey rsa:2048 -keyout mykey.pem -out mycert.pem -subj '/O=MYORG/OU=MYUNIT/C=MY/ST=MYSTATE/L=MYCITY/CN=proxy1.com' -days 730
You will use mycert.pem to certificate the Apache/Nginx server proxy1.com, so the part "CN=proxy1.com" is important.
Import the certificate to Java truststore. This step is necessary to make gadgets work. Because Java keytool does not accept PEM file, you need to convert
mycert.peminto DER format.openssl x509 -outform der -in mycert.pem -out mycert.der
keytool -import -trustcacerts -file mycert.der -keystore $JAVA_HOME/jre/lib/security/cacerts -alias proxy1.com
Note
The default password of the Java keystore is "changeit".
Users will need to point their browser to https://proxy1.com and accept the certificate exception.
Before you start, note that details of Apache setup is not described here, and it depends on Apache version and your OS, so consult Apache documentation if you need.
Required modules
You need mod_ssl, mod_proxy and mod_proxy_ajp. They are all standard Apache 2 modules, so no installation is required. You just need to enable it with the following command:
sudo a2enmod ssl proxy proxy_http proxy_ajp
Configuring a virtual host for SSL port
Add this to site configuration (you should override the default ssl site /etc/apache2/sites-enabled/default-ssl.conf):
<IfModule mod_ssl.c>
	<VirtualHost *:443>
		ServerName proxy1.com
		ProxyPass / http://exo1.com:8080/
		ProxyPassReverse / http://exo1.com:8080/
		ProxyRequests Off
		ProxyPreserveHost Off

		SSLEngine On
		SSLCertificateFile /path/to/file/mycert.pem
		SSLCertificateKeyFile /path/to/file/mykey.pem
	</VirtualHost>
</IfModule>
Here you use HTTP. For AJP, change ProxyPass and ProxyPassReverse as below:
		ProxyPass / ajp://exo1.com:8009/
		ProxyPassReverse / ajp://exo1.com:8009/
Note
Remember to import your certificate into Java truststore, because proxy1.com needs to be trusted by the eXo Platform JVM instance, otherwise the embedded gadget server (Apache Shindig) will not work. See the section Importing your SSL certificate into Java truststore.
Instruction for installing Nginx can be found here. In Debian/Ubuntu you can install Nginx with the following command: apt-get install nginx.
Configure the server proxy1.com at port 443 as the following
(you can put the configuration in a file like /etc/nginx/sites-enabled/proxy1.com):
server {
	listen 443;
	server_name proxy1.com;
	ssl on;
	ssl_certificate /path/to/file/mycert.pem;
	ssl_certificate_key /path/to/file/mykey.pem;

	location / {
		proxy_pass http://exo1.com:8080;
	}
}
The configuration here is a simple one and it works. For an advanced sample, you may read this blog post.
Note
Again, remember to import your certificate into Java keystore, because proxy1.com needs to be trusted by the eXo Platform JVM instance, otherwise the embedded gadget server (Apache Shindig) will not work. See the section Importing your SSL certificate into Java truststore.
Configuring AJP/HTTP connector
As explained before, you can choose either AJP or HTTP. In both eXo Platform Tomcat and JBoss, there is a default HTTP (8080) connector. If you are using AJP, there is a default AJP (8009) connector in Tomcat, but you will need to create one in JBoss.
In any case, you should configure the connector so that eXo Platform is aware of the proxy in front of it.
In Tomcat
It is configured in $PLATFORM_TOMCAT_HOME/conf/server.xml. You will add proxy parameters then it will be:
<Connector address="0.0.0.0" port="8080" protocol="org.apache.coyote.http11.Http11NioProtocol"

  enableLookups="false" redirectPort="8443"

  connectionTimeout="20000" disableUploadTimeout="true"

  URIEncoding="UTF-8"

  compression="off" compressionMinSize="2048"

  noCompressionUserAgents=".*MSIE 6.*" compressableMimeType="text/html,text/xml,text/plain,text/css,text/javascript"

  proxyName="proxy1.com" proxyPort="443" scheme="https" />
Or with AJP:
<Connector address="0.0.0.0" port="8009" protocol="AJP/1.3"

  connectionTimeout="20000"

  redirectPort="8443"

  URIEncoding="UTF-8"

  proxyName="proxy1.com" proxyPort="443" scheme="https" />
In JBoss
It is configured in $PLATFORM_JBOSS_HOME/standalone/configuration/standalone-exo.xml
(or standalone-exo-cluster.xml in cluster mode).
You need to modify the subsystem urn:jboss:domain:web:1.5 like the following:
<subsystem xmlns="urn:jboss:domain:web:1.5" default-virtual-server="default-host" native="false">

    <connector name="http" protocol="HTTP/1.1" socket-binding="http" scheme="https"  proxy-name="proxy1.com" proxy-port="443"/>

    <!-- If you use AJP -->

    <connector name="ajp" protocol="AJP/1.3" socket-binding="ajp" scheme="https" proxy-name="proxy1.com" proxy-port="443"/>

    ...

</subsystem>
The socket-binding ports are configured already, find these lines if you want to check:
<socket-binding name="ajp" port="8009"/>

<socket-binding name="http" port="8080"/>
After restarting the proxy and eXo Platform, you can test https://proxy1.com. If you are testing with dummy server names, make sure you created the hosts proxy1.com and exo1.com.